I've been motorcycling now for over two years, and amongst all my rides within Colorado, there's been a pass I've tried to ride twice during that time and twice found my way blocked by snow and ice. Bad timing and bad planning on my part usually was at fault.
Today was a gloriously sunny day with a promise of temperatures in the low 80s so I headed out towards Rocky Mountain National Park and the Trail Ridge Road which traverses it and across the Continental Divide. Along the way, I stopped to document my motorcycle having been ridden to five other passes/saddles for my ongoing Passbagger 50 effort.
I arrived at Rocky Mountain National Park next to Estes Park a bit before noon. Traffic was medium heavy I would say, lots of cagers and motorcycles out to enjoy the views offered by the Trail Ridge Road. $10 a person is the cost one pays and its well worth it!
This road is so full of vast and awe inspiring mountain vistas that I kind of went a bit overboard with the panoramic shots as you can see below. I hope you like them.
A great day of riding, finally bagged Milner Pass on the third attempt and managed to also add five other passes to the list of ridden passes. I wore my Cycleport Jacket and it kept me comfortable when the temperatures hit 90 according to my onboard thermometer and down to 50 degrees with my Sheltex liner underneath. My Cycleport pants should be back this Monday, I'd sent them back for some slight mods around the knees.
End of month mileage reading: 57,616 - 2232 miles since last end of month reading.
Saturday, May 31, 2008
Friday, May 30, 2008
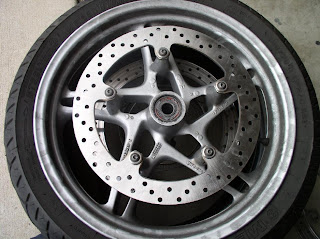
More Wrenching - Replacing Front Brake Discs and Brake Pads
All the parts I needed to replace the scored and worn down front brake discs and new brake pads by EBC arrived at the dealer today. I picked them up on the way home, the EBC pads were similar but somewhat different from the BMW pads I had on the motorcycle but the parts guy and his manager assured me they were correct. More on that later.
I happily rode home, got my tools out and my Clymer manual and got to work.
I ignored the first step about removing the wheel cover, ended up having to do it anyways, should have followed instructions!
Following the instructions step by step and methodically, I was able to remove the front tire with very little hassle. Hardest part was figuring out how to hold the wheel level while pulling out the axle rod!
I cleaned parts as I went since I had things apart and could easily get to things. Things were going smoothly so far. I used an old motorcycle tire I had from my first flat incident to set the front tire on so that the brake discs did not touch the ground. This is important!
After I had the brake discs replaced and threadlocked, I put the wheel back onto the front forks. The front axle rod went in pretty easily I must admit, much easier than when I pulled it out! The manual said to make sure to correctly position the speedometer housing, when I went to check, I had placed it just right purely by chance! : )
As I followed the installation sequence in the manual, I came to the point where one is to mount the brake calipers onto the forks. I paused here to grab the EBC brake pads I had bought from the dealer and dammit, they were the wrong size! They simply would not fit! I was a bit mad at this, I called up the parts manager and told him the situation. To their continuing credit, he apologized profusely and said to bring them back even though I'd opened their packaging and he'd get me the right ones.
So, I got in the cage, an hour plus an additional $69 dollars for the added cost of BMW brake pads since they did not have EBC pads for my motorocycle later, I was back home and continued working on putting Maria back together. Proper prior planning and checking on my part would have had me ordering EBC pads online for a better price so I was mostly annoyed with myself.
The new pads went in just fine, duh. I torqued all fasteners to the proper torque, checked that the pads engaged the discs fine, made sure the wheel spun freely, replaced the wheel cover and put away my tools before heading out for a 15 mile test ride.
The ride went fine, the brakes worked when I wanted them to and I felt no chatter, heard no brake squealing and tried a few hard brakings to see how things felt. Smooth braking as usual. As a bonus, the front wheel did not come off at any time! ; )
Here's pictures of Maria's new front brake discs:
Yet another successful wrench job done with no major issues. The only glitch was that I had stripped slightly the brake pad retention spring on the right brake caliper last night apparently. But, now I was "experienced" at extracting stripped screws and 10 minutes later, I got it out. I had bought a new pin set from the dealer so I am now good to go on both front calipers.
Taking the front wheel off was so easy, I am seriously considering whether I should learn how to change my own tires and save the labor costs of having the dealer do it. I'd always had qualms about removing the front tire as it looked "complicated", it could not be easier.
Must investigate this further. The front tire is due for replacement soon and I am not ready for it equipment-wise so the dealer will be doing it.
Thursday, May 29, 2008
Waiting too long to replace the front brake pads
So I'd been hearing a pretty loud rubbing sound the last couple of days when activating the brakes while at low/crawl speeds. The brakes seemed to work fine so I kept forgetting to take a closer look. Apparently, I'd been too careless in checking the wear on the front brake pads as they were pretty much out of the ablative material and it was the actual metal backing of the pads themselves that was in contact with my front brake discs!
Yep, stupid....careless, yep that's me. Now I know you have to really get closeup and peer into each caliper to look for the evidence of wear marks on the pads. I could kick myself, I knew better! I blame my aging eyes, I have to remove my glasses to do any kind of closeup work these days.
So, I discover all this last night after supper so I thought: hey, I've still got the old pads that have some wear on them....I'll swap them out now and order some new pads in the morning!
Only one major problem while doing the swap of the pads, I stripped the Torx screw portion of the pin that holds the brake pads in place within the left caliper! Aaaarrrggghhhh! Hours later and having tried other sized Torx wrenches and whatnot, I remembered I'd bought a stripped screw extractor kit from Harborfreight!
After some searching, I found it, and learned how to use it for the first time. I had to call a friend of mine who actually had done this and he walked me through the process (thanks Rob!). Took a few attempts and gradually increasing the size of the extractor before I got it to engage in the hole I'd drilled into the stripped Torx screw! What a pain this was. Not to mention, I did not have a good tool to hold onto the square end of the extractor and had to resort to vise grips! I must find something that will do a better job.
Finally, the motorcycling wrenching god took pity on me and the extractor not only gripped but I was able to break the tight grip the pin had on the caliper housing! Out the sucker came and promptly broke off in my hand. I am so glad it did not break off within the caliper housing!
Of course, the front brake discs now have very slight but noticeable by feel grooves worn into them by the pads which I allowed to wear down too much! I'd been monitoring the thickness of the discs anyways since the were down to 5mm in thickness and would be out of spec at 4.5 mm. So replacing them had been on the mid-to-far maintenance horizon, now they're in the "do it now" maintenance window!
I've got a pair on order for the front, the back disc is fine. They should be here in a few days and I'll swap them out at that time and put brand new brake pads in then. No sense putting new pads in on brake discs that are "worse for the wear" eh?
I got the kit to replace the brake pad retaining pin and put it in today. Got a new set of Torx socket drivers and torqued the caliper retaining screws to spec as well. I did NOT overtighten the new brake pad retaining pin, relying instead as the designers did I am assuming, on the spring preventing it from working itself out.
The circled item above is the wear mark I failed to monitor closely during weekly checks
The arrow shows how little material remains on the old pads I reinstalled. So Check yours now and make sure they're not as close together as mine are!
Too thin to try and "turn" to smooth them out, must buy new ones.
Trying to see the silver lining to all this:
I learned that one can't be too quick when doing maintenance checks. In other words, do it right and often or pay the piper.
I learned how to use a screw extractor tool. I am sure there are further stripped screws/fasteners in my future, it'll happen again.
I did not learn about the worn down pads and brake disc after they failed me during a stop, so no one got hurt, specially me.
If you replace pads, and the old ones still have some life in them, keep them around. You never know when they might come in handy.
So, don't just sit there, go out there and see how much wear is left on your own brake pads! The price is high for not watching them closely. I got 13k out of the old pads, will probably just swap them out regularly at 10K or so from now on.
Monday, May 26, 2008
Memorial Day at Fort Logan National Cemetery
Temperatures from mid 50s to low 60s, heavily overcast.
Today I rode over to Fort Logan National Cemetery to honor those who've served and given their life for our country. The cemetery is on the grounds of Fort Logan, one of the last western forts of the US West. More info here on Ft. Logan: LINK
There were definitely more people there at the cemetery this Memorial Day. Unlike last year's Veteran's Day event, there were more US Flags lining the cemetery's roads and there were individual small US flags at each tombstone. I was glad to see such honors rendered to our veterans, I suspect that part of the reason for the extra effort this year was that Colorado Governor Ritter was a speaker at the event hosted by the VFW. Regardless, I was happy that extra efforts were made, as the tombstones had not had flags planted in front of each last year during Veteran's Day. LINK.
I parked Maria pretty far away from the area where the ceremonies would be held. I wanted to get away from the crowds near the main cemetery area and the slow moving lines of cars seeking parking spots.
The above pictures, I hope, will give you some idea of the numbers of fallen veterans and their family members who are interred here at Fort Logan. Fort Logan, as of fiscal year 2007, has 92,243 such servicemen and women who've been laid to rest in its 214 acres. Try to grasp in your minds eye, the further numbers of veterans nationwide laying at rest in our nation's other national cemeteries and public/private cemeteries as well.
At 1100am, the ceremonies and speeches kicked off. The speakers took turns praising our veterans of past wars and present conflicts. The Nation's colors were presented and patriotic songs were sung along with the National Anthem. Four F15 Fighter Jets roared overhead near the end of the ceremony, much to the crowd's delight.
Near the end of the ceremony, rifle shots rang out in the customary military salute and Taps sounded from several locations around the crowd. Each horn player starting slightly behind the first, so the the melody echoed through the cemetery as we all reflected on the sacrifices of veterans, past and present.
The Colors were flying this long weekend at my home, I hope the flew at yours as well to honor all veterans past and present for their service.
Sunday, May 25, 2008
Riding CO119's Canyon Roads
I headed out after an early lunch today, with no objective in mind, hoping for some inspiration to hit while on the motorcycle.
I was headed towards Boulder on US36 when I thought I recalled that the National Renewable Energy Lab was on that road and picked that as my destination since its located near an interesting mesa I'd been hesitant to explore due to the "keep out" signs. The plan was to see if any guards were around, if not, then go in to see how far I could go.
Alas, it was not US36 that the lab is located on. I ended up in slow moving traffic in Boulder, slowly building up heat as I crawled along with the cagers. I spotted the sign saying CO119 junction and took it. I headed west out of the people's republic of boulder and was soon in canyon land. Traffic was moderately heavy but not too bad.
There was no chance for spirited riding in spite of no police presence. I think the police knew that with so many cars on the roads, no way for anyone to speed. Still, the twists and turns couple with view of the high rocky walls on both sides of the pavement made for a great ride.
I even "discovered" Sugar Loaf Mountain road which is a very nice two lane twisty road heading up towards Sugar Loaf Mountain. Very nice vistas of Boulder can be hand but the road itself is worth a trip.
I turned around where Sugar Loaf Mountain road becomes dirt. Once back on CO119 I continued heading West. The river which borders CO119 was running pretty full and fast with the melting snows from the mountains. It made for a nice contrast to the jumble of rocks high up on the canyon walls.
I got to Nederland and continued on CO119 through this small town. I soon saw signs for Blackhawk and Central City and knew I was approaching US6.
Once past the gambling towns, I headed on US6 back towards Golden. Traffic was much heavier at this point. A lot of folks were out and parked by any open spot next to the road to enjoy the waters in the river. Still no police in evidence but enough gawking cagers to keep one's speed down to about 10 over the limit if lucky.
Once in Golden I just headed hope on C-470/E-470. Memorial Day tomorrow, make sure to fly the colors in remembrance of those who served and gave their all for this great country of ours.
Saturday, May 24, 2008
First Pikes Peak Ride of the Year and a visit to Sphinx Park
Temperatures ranging from low 30s to low 70s depending on where I was in relation to the top of Pikes Peak. Sunny, with some clouds.
About 230 miles of riding today found me on superslabs, city streets, narrow mountain roads and with conditions ranging from dry pavement to icy spots on hairpin turns. Ah, Colorado riding!
I'd originally departed the house thinking I'd take the slab down to Colorado Springs, catch US24 to Colo 67, Deckers, then US285 back towards Morrison and the Denver Metro Area. For the most part, I followed this plan, with a slight 32 mile round trip detour to go up Pikes Peak.
The park ranger told me only 15 of the 19 miles were open. I was expecting that since I could see that Pikes Peak was still quite snow covered at its upper third.
I donned my Sheltex liner under my Cycleport Jacket and rode sedately up the mountain road known as Pikes Peak Highway. The ride up was no problem, even the hard packed dirt road portions were quite manageable. As I approached the Glen Cove Inn past mile marker 12, I fully expected to find the way barred due to ice and snow. I was pleasantly surprised to see a sign saying the way was open. Onwards!
I'd been making my way up gingerly up, avoiding increasing numbers of icy patches on the road and specially where melting ice had reformed back to ice on the hairpin turns. There'd been a feeling of growing trepidation on my part and once I rounded the last hairpin past mile marker 16 I saw this:
At the above sight, I slowed to a stop and you can see where I prepared to turn around. At this point I was at around 13,000 feet in altitude, near The Devil's Playground. Getting all the way to the top would have to wait until another day.
I took the following shots on my way down the mountain.
I arrived back at Glen Cove and stopped to take a picture of these seriously heavy duty snow blowers that they use to keep the roads clear. Pretty impressive machines.
The rest of the way down the mountain was pretty uneventful, the speed limits working to keep one from being too spirited in enjoying the twists and turns, but still very enjoyable.
I exited the Pikes Peak Park area and headed West on US24 towards Woodland Park. Here I turned North where US24 junctions with Colo 67 heading towards Deckers. Once you clear Woodland Park you begin to see the still pretty much denuded hillsides where massive fires wreaked havoc years ago. You see signs of recovery but its got a long way to go.
There's some nice winding turns and curves on the way to and past Deckers. I was enjoying the ride so much I did not even stop at Deckers for a break. I continued on, twisting my way past hillside ranches and climbing my way back to US285. This road is highly recommend for its twists and turns. Just watch for idiot cagers and you'll be fine.
Near Pine Grove I detoured to go and take the following pictures of the rock formations and rock domes near Sphinx Park. I rode all the way to the Buck Snort Saloon and turned around to pose Maria by the rock formations:
After returning to Colo 67 from Sphinx Park, I continued on till it junctioned with US285. I went East on US285 and rode all the way past Morrison until I got on the C-470 slab which one can take to round the West and South edges of the Denver Metro area. I got home by 1515hrs and an early dinner with the family. A good ending to the day after a good ride through the mountains near Denver.
About 230 miles of riding today found me on superslabs, city streets, narrow mountain roads and with conditions ranging from dry pavement to icy spots on hairpin turns. Ah, Colorado riding!
I'd originally departed the house thinking I'd take the slab down to Colorado Springs, catch US24 to Colo 67, Deckers, then US285 back towards Morrison and the Denver Metro Area. For the most part, I followed this plan, with a slight 32 mile round trip detour to go up Pikes Peak.
The park ranger told me only 15 of the 19 miles were open. I was expecting that since I could see that Pikes Peak was still quite snow covered at its upper third.
I donned my Sheltex liner under my Cycleport Jacket and rode sedately up the mountain road known as Pikes Peak Highway. The ride up was no problem, even the hard packed dirt road portions were quite manageable. As I approached the Glen Cove Inn past mile marker 12, I fully expected to find the way barred due to ice and snow. I was pleasantly surprised to see a sign saying the way was open. Onwards!
I'd been making my way up gingerly up, avoiding increasing numbers of icy patches on the road and specially where melting ice had reformed back to ice on the hairpin turns. There'd been a feeling of growing trepidation on my part and once I rounded the last hairpin past mile marker 16 I saw this:
At the above sight, I slowed to a stop and you can see where I prepared to turn around. At this point I was at around 13,000 feet in altitude, near The Devil's Playground. Getting all the way to the top would have to wait until another day.
I took the following shots on my way down the mountain.
I arrived back at Glen Cove and stopped to take a picture of these seriously heavy duty snow blowers that they use to keep the roads clear. Pretty impressive machines.
The rest of the way down the mountain was pretty uneventful, the speed limits working to keep one from being too spirited in enjoying the twists and turns, but still very enjoyable.
I exited the Pikes Peak Park area and headed West on US24 towards Woodland Park. Here I turned North where US24 junctions with Colo 67 heading towards Deckers. Once you clear Woodland Park you begin to see the still pretty much denuded hillsides where massive fires wreaked havoc years ago. You see signs of recovery but its got a long way to go.
There's some nice winding turns and curves on the way to and past Deckers. I was enjoying the ride so much I did not even stop at Deckers for a break. I continued on, twisting my way past hillside ranches and climbing my way back to US285. This road is highly recommend for its twists and turns. Just watch for idiot cagers and you'll be fine.
Near Pine Grove I detoured to go and take the following pictures of the rock formations and rock domes near Sphinx Park. I rode all the way to the Buck Snort Saloon and turned around to pose Maria by the rock formations:
After returning to Colo 67 from Sphinx Park, I continued on till it junctioned with US285. I went East on US285 and rode all the way past Morrison until I got on the C-470 slab which one can take to round the West and South edges of the Denver Metro area. I got home by 1515hrs and an early dinner with the family. A good ending to the day after a good ride through the mountains near Denver.
Subscribe to:
Posts (Atom)