Showing posts with label Mariko Repairs. Show all posts

Wednesday, August 03, 2022

A Recce of Campsites and Posing on a Big Rock - On Rampart Range Road

 Today, it was time to do some more stress testing of the new Toyota 3K Carburetor and the Sammy's cooling system since I had the radiator flushed yesterday.

I would end up driving 149 miles round trip.  I used CO Hwy 83 to get to Colorado Springs where I picked up US24 to CO Hwy 67 and thence to the southern end of Rampart Range Road.

From there it was about 10 miles to the site of a planned gathering by motorcycle riding friends, called The Revival.  It's been going on for years if not decades and this will be the first time for me if I do end up going.

Stress testing aside, I wanted to see if there were RV-able campsites near the Revival site, since the actual Revival site wasn't doable by Umarang, the VRRV.  It was just out of my comfort level you see.

The Revival Site is next to a large outcropping of rocks and perhaps part of a rock dome as well.  No problem negotiating the "path" with the Sammy, but the VRRV would have issues with low branches and tight spaces.

After picking up a 13 lb trash bag's worth of trash at the Revival Site (people are swine); I found a couple of sites that were usable close to where FR324 and FR300 (aka Rampart Range Rd) meet.  So getting the VRRV to within a mile of the actual site is doable!  Now to figure out my schedule accordingly.

I then spent the rest of the drive, heading north on Rampart Range Rd and checking out likely camping sites.  I found several tight ones, with steep entrance paths, and most of them without cell signal.  I did find one though, about 7.5 miles the Revival Site that'll work and function as Plan B if the primary camping sites are taken when and if I show up.

Soon after exploring this last site, I entered the Fee Area run by the Forest Service and their requirement that you camp only at designated sites.  I didn't bother checking these sites out as they were too far from the Revival Site.

However, I did stop at this large rock formation, to pose the Sammy on top of it!  After a careful walkthrough, I put the Sammy into 4WD and Low Range and crept up the side of the rock, no problem!


At this point, I was standing in front of the Sammy and heard what sounded like the whooshing sound of something under pressure, being released.  Weird.

I opened the hood and looked around, didn't see anything in my quick scan.

I started the engine in preparation for backing down the rock and the Sammy was running rough!  It was the same symptoms for when the old carburetor wasn't getting enough fuel to run the engine!  

Once I got it sort of working, I started backing down, planning a more thorough inspection once I was back by the side of the road.  The engine quit about halfway down and I let the Sammy coast down and stopped.

I could now see, in front of me on the rock a trail of liquid!  It was gasoline, and had started spewing when I started the engine.  I checked under the hood and this time I spotted where the fuel line to the carburetor had come off the outlet port on the mechanical fuel pump!  Doh!  That was the pressure release noise!  

It remains unclear to me what caused this pressure that caused the line to come off...the drive up the rock and the approximately 45 degree angle of climb?  Had the dirt road's bumps caused it to come loose enough?

I reconnected the hose and the Sammy was right as rain again.

I drove north and took the usual route back to CO Hwy 105 and from there, to Castle Rock, Parker and home.  No issues except for the second instance of the day when I had to come to a stop pretty quickly due to a changing stop light.

I stopped fine but the engine died.  It had happened once before in this drive, also at a sudden stop.  Hmmm.  The Sammy started up just fine both times, I'll have to drop an email to the carburetor guy and ask him if this is normal.

Still, overall, a good day of Sammy driving!  Oh, and my souvenir from Hawaii did fine on the dashboard:


His name is Russell Crow, and represents all the chickens that are everywhere on the island of Kauai!

Tuesday, August 02, 2022

Home again and I meet another Samurai Enthusiast

Monday, Aug 1

Happy Colorado Day!  Thought about doing the usual compiling of Colorado pictures over the last year; but it turned out not many pictures available!

After an hour and 20 minute delay due to personnel issues on the part of United Airlines (sick flight attendant); we managed to leave Kauai and survived the 6.5 hour long plane ride home at almost 8:30PM HST.

We got back to the overcrowded cesspool that is Denver at 7:30 AM MDT (I think), my mind was fuzzy from the uncomfortable sleep positions I tried after dinner on the plane.  I don't think I slept more than a few minutes at a time before some pain caused me to shift positions.  Oh well.

The Things picked us up and we all went home without further incident.  I was wiped out and after some light unpacking and a light breakfast, crashed till mid-afternoon.  Martha, on the other hand, powered on to her first day of the new school season!

Tuesday, Aug 2

I drove the Sammy to a new mechanic's shop: Big Nick's Gasoline & Diesel Repair.  The shop is the one that recently replaced Thing Two's truck's radiator and they had good reviews from neighborhood friends.  So I decided to have them do the radiator flush on the Sammy, see what kind of vibes I would get from them since I'd not met "Big Nick" before.

The shop is only a 12 minute walk from home, so conveniently located.

Turns out, he's a Samurai Enthusiast!  He looked over the Sammy and remarked on how good a condition she seemed to be, cosmetically of course.  I dropped the Sammy off, and would have it back about an hour later.  No issues, radiator flush done, and good vibes received about Big Nick and his operation.

The Sammy awaiting her radiator's flushing,
kind of looks like she's smiling eh?

Nick also showed me his son's Samurai rig:

Yeah, not street legal...

The above rig started life as a Suzuki Samurai but has been quite modified.  It's got a Toyota Engine in it, giving it an additional 85 HP and is the most easy, drop-in, engine swap for a Sammy.  It's also now an automatic transmission vehicle.  

Since they were going to drain the old coolant from the Sammy, I asked Nick to also remove the old carburetor's thermal choke which I'd left in place when I removed the old carburetor.  

Now, the choke is gone, and it's a single hose forming a loop for the coolant to just flow through:

Tomorrow, I plan to drive the Sammy over 100 miles to stress test the cooling system after it being flushed.  I'm also trying out a way to carry more gas with me in the cargo area of the Sammy:


The ROK straps hold it securely, the wood base should prevent rubbing damage on the bottom.  If it spills, its not on the side with the exhaust pipe and it's open to the air of course.

If the above proof of concept works tomorrow, I'll make it a bit more clean in terms of straps and such.

Oh, also found a minor leak on the gas tubing leading from fuel filter to the Sammy's gas line.  Replaced, and no more leaks.  The Toyota 3K carburetor continues to run great.

Sunday, July 03, 2022

Testing an Air Conditioning Option for the VRRV and Removing the Old Carburetor from the Sammy

Saturday, July 2

Busy day today for me.  While Martha continues to recuperate from her so far mild Covid symptoms, I kept busy out in the garage.

First was testing whether the office AC unit Martha had purchased years ago to cool down my home office would work with the Harbor Freight 2000 Watt Generator.  

It does!  The small AC unit pulls 8 Amps and the generator is rated up to 13 Amps.  That said, there's no running the generator in Econo mode, it runs at full performance mode.  I ran it for about 4 hours, using about 1/2 of the 1 Gallon gas tank.

It's an 8000 BTU unit and it did "OK".  The temperature outside was 93°F (33.8°C), the inside thermometer showed 85°F (29.4°C) and the AC unit's thermometer reported betwee 79-80°F (26.1-26.6°C).  It felt comfortable inside in these temperature conditions.  Not cold, by any measure, but comfortable.


Yes, I can always run the onboard AC unit (15,000 BTU) with the onboard 4KW Generator.  This option though, uses perhaps .5-.7 gallons of gas/hour.  Given present gasoline prices, I'm seeking more cheaper/efficient options.

In the afternoon, I got it into my head to do some more troubleshooting of the old carburetor on the Sammy.  Trying this and that, I moved onto trying to access the fuel bowl to check for contaminants.  

Note:  The stock carburetor, has been described by MikeW, the Sammy Guru, as "a nightmare".  

I got to a point where there was no turning back, I couldn't easily put things back together and had still failed to remove the top half of the carburetor in order to access the fuel bowl!  Dammit.

So, I went ahead and removed the old stock carburetor!  

No worries, this move had been in the plan since I'd previously ordered a Toyota 3k Carburetor and Installation Kit from Certified Machine.  

They sell carburetors that they've gone over and tuned before shipping to the customer.  They even mount it on their rolling test Samurai to ensure its working fine.  

Their install kit contains all the hardware and parts I'll need to mount the new carburetor, a manual choke cable kit, and plugs for all the vacuum lines involved with the old carburetor that are no longer needed.  

In other words,  a simpler and known reliable carburetor model with no EGR crap!  

Never, ever, buy a late 80s carbureted car that was configured for California.  Worst of all worlds in terms of simplicity in their efforts to pass emissions.

Here's what the Toyota 3K looks like:


The new carburetor will have a manual choke vs the sometimes iffy thermal choke used by the old stock carburetor.  Certified Machine says it'll pass emissions testing just fine.

Here's views of the old Hitachi carburetor, cleaned up (somewhat) for comparison:

Starboard side

Front side

Rear side

Port Side

Top side

Bottom side

Various bits (mostly EGR related)
that were attached to the carburetor

Took me about 2-3 hours, closer to 2, to remove the stock carburetor once I decided to do so.  Here's the engine without the overly complicated stock carburetor:


The holes for the carburetor mount are
now filled with shop towels to prevent 
any crud from falling inside.


I'm still awaiting shipping confirmation from Certified Machine, I think the 4th of July Weekend will delay shipment till next week but that's OK.  It would be nice to install the new carb before flying off to Hawaii but it can also wait till the end of the month when we return from there.

I'll spend time tomorrow cleaning up the area around the carburetor mount/intake manifold.

Update: the AC option explored in this post won't work for the VRRV.

Sunday, May 29, 2022

Carburetor Issues dictate a Hiatus for Sammy Repairs

First, my thanks to RichardM, Lori and ChrisZ and of course MikeW (Sammy Guru in NM) for their time and knowledge/advice given while trying to troubleshoot remotely the fuel delivery issues encountered on the Sammy recently.

Bottom line, it looks like fuel is now flowing reliably to the carburetor but not making it into the fuel bowl.  No fuel in the bowl, means fuel starvation.  This of course means it bogs down on acceleration.  

Leading up to the determination of the above condition:

Drained/Dismounted the Sammy's gas tank, verified interior was pristine, very little debris (no larger than grains of sand) found in drained gasoline.  

Replaced a failed electric fuel pump, the theory was intermittent failure was causing the fuel starvation issues, but alas, probably not.  It had still made the noise of functioning but apparently, no flow.

The stock carburetor on the Samurai, is a Hitachi DFB306-832 and is quite the complicated beast. A shining example of the complex and in the long term futile efforts to do emissions control back in the late 80's on carbureted cars.

cost for refurbed version: $200-300

Now add the plethora of vacuum lines, coolant tubes and solenoid wiring and it makes for quite the complex POS.

I will not be having someone work on the carburetor, nor will I get another one to replace the existing one.  No sense getting another complex and probably unreliable carburetor!

Instead, the plan is to remove the stock carburetor and put in a simpler more modern carburetor, known as a Toyota 3K.  One without a single emissions control related feature, but which passes emissions testing of course since that's mandated in the area I live in: Metro Denver Cesspool.  

Not a single vacuum line, solenoid or sensor!
Cost: < $100

Another great benefit to swapping the carburetor is that the Sammy will no longer have ANY use for the ECM: Electronics Control Module.  They deteriorate with age, are no longer made, and one has to hope to find a good used one when needed.  The Sammy will NOT run with a bad ECM even if the carburetor is fine.

The swap will probably happen in August after Martha and I return from our summer vacation trips.  I'll tow the Sammy to New Mexico and MikeW will do the install and I'll stress test it for a while.  MikeW, the Sammy guru, describes the stock carburetor as "a nightmare".  He won't work on them, instead, when his fails, he'll put on the same type of simpler carburetor he will put on my Sammy.

So, different vehicles will be taken on the upcoming camping trip with Martha, tune in to find out.

Thursday, May 26, 2022

Pikes Peak Views and the Sammy now experiencing fuel delivery issues. (was needs a new clutch)

 Wednesday, May 25

A windy day, which made things a bit brisk as I drove the Sammy south of the town of Parker, CO and past the Castlewood Canyon State Park.

I'd originally planned on checking out the hiking trails within this park but the steady winds convinced me that the hiking would be too chilly.

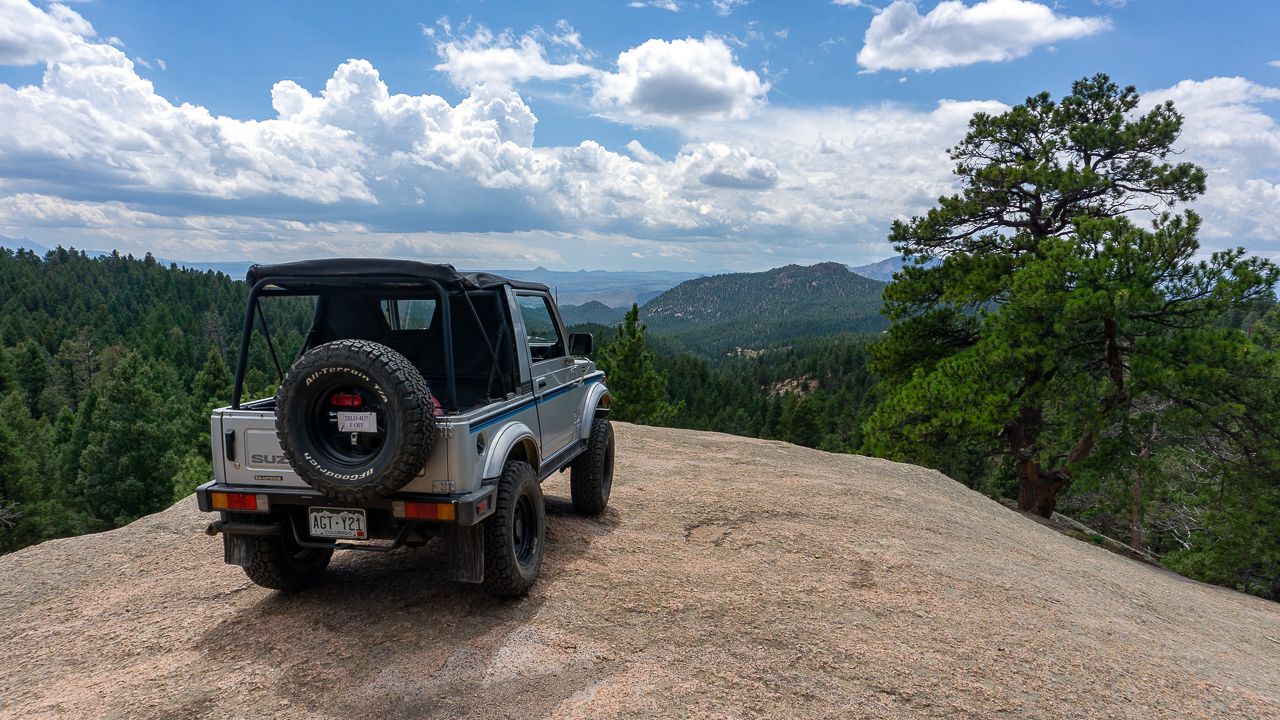
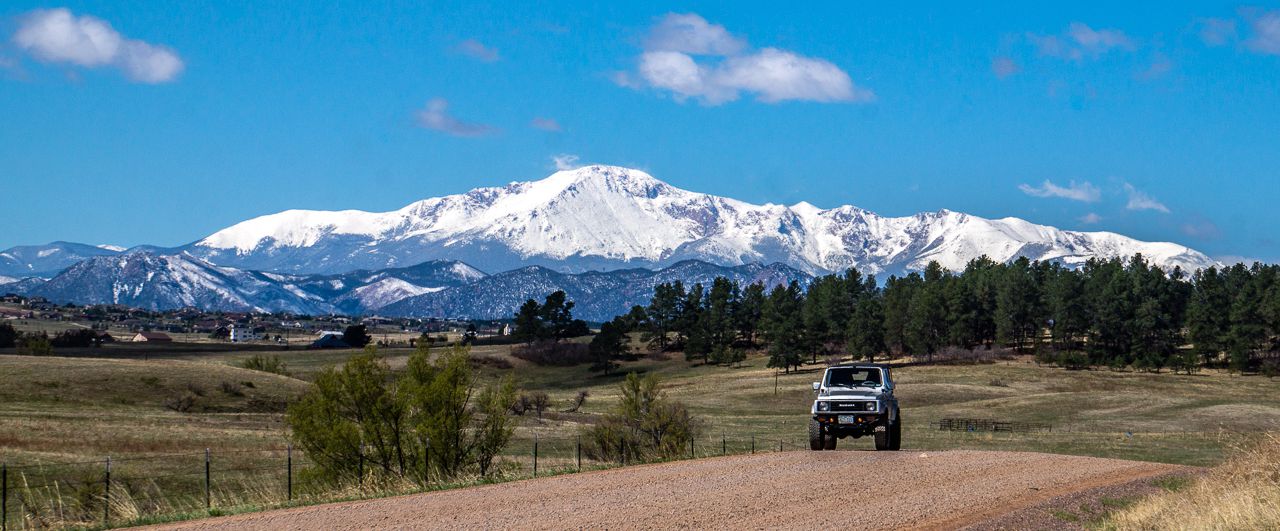
Instead, I drove a bit further south and got pictures of the Sammy with Pikes Peak in the background:

On the side of State Highway 83

I then moved the Sammy north a bit to County Rd 80 and found a better angle on Pikes Peak:


No mechanical issues encountered with the Sammy, I was happy.

Thursday, May 26

Glorious day today in terms of weather, sunny and warm with very gentle breezes.  Drove the Sammy to Rampart Range Road by way of Jackson Creek Road off of CO Hwy 105.  It is a much shorter drive than the normal driving to the north end of Rampart Range Road using CO Hwy 67.

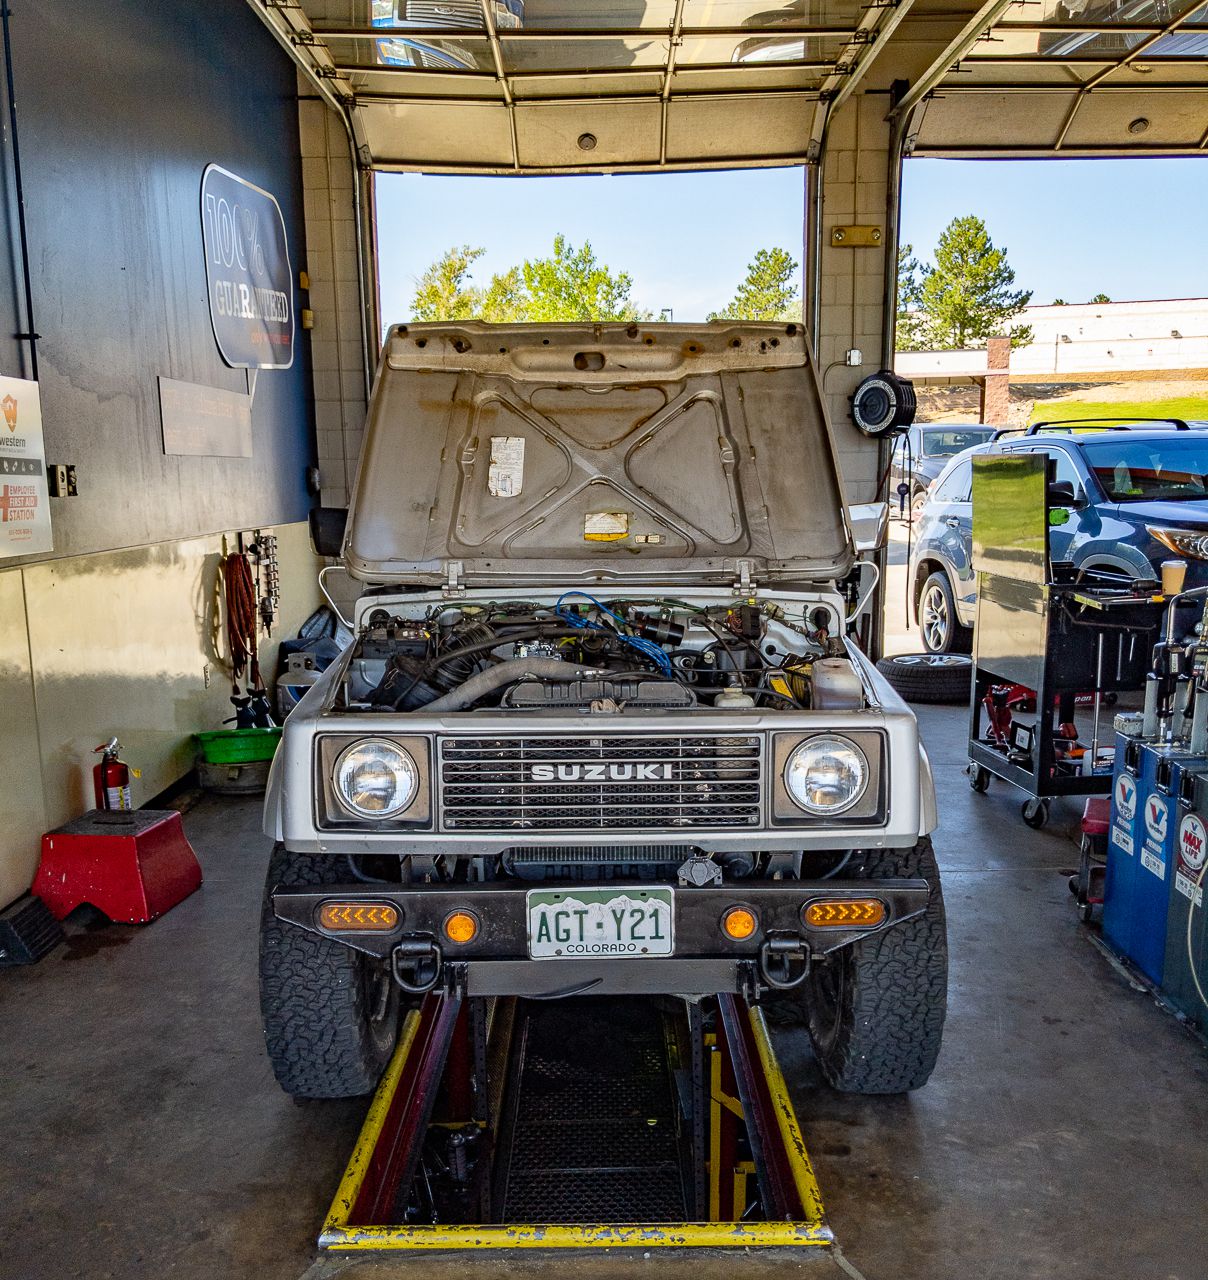
The Sammy was doing great until about 3 hours or so into the ride.  Then, she acted like she had no power, especially on uphill portions of the road.  I thought it might be a dirty air filter so I swapped it out for the spare I carry.  This seemed to be the solution for about another few miles but then the lack of power/hesitation returned.

I was having to really drive up the RPMs to maintain headway, and definitely to get her moving while in first gear.  I continued to fixate on it being a possible air leak/vacuum leak issue but found nothing untoward during the couple of times I stopped to check in with RichardM.

Got her home after negotiating starts from stops in the following manner:  Rev up the engine and hold higher revs than normal for first gear while letting out the clutch.  The Sammy would kind of slowly move forward for a bit and then something would "catch" and she'd move out as normal except of course faster since I had the revs up.

I was "premature" in thinking it was a clutch issue.  The info I gave MikeW led us down the wrong path it seems.

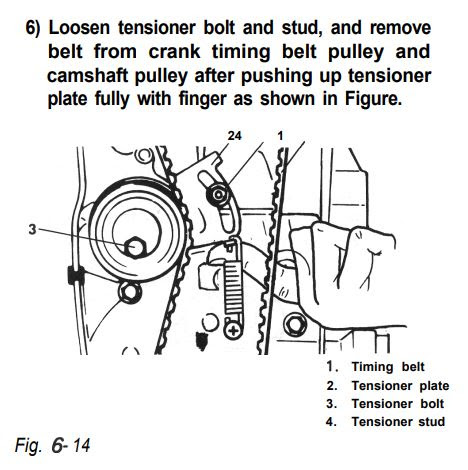
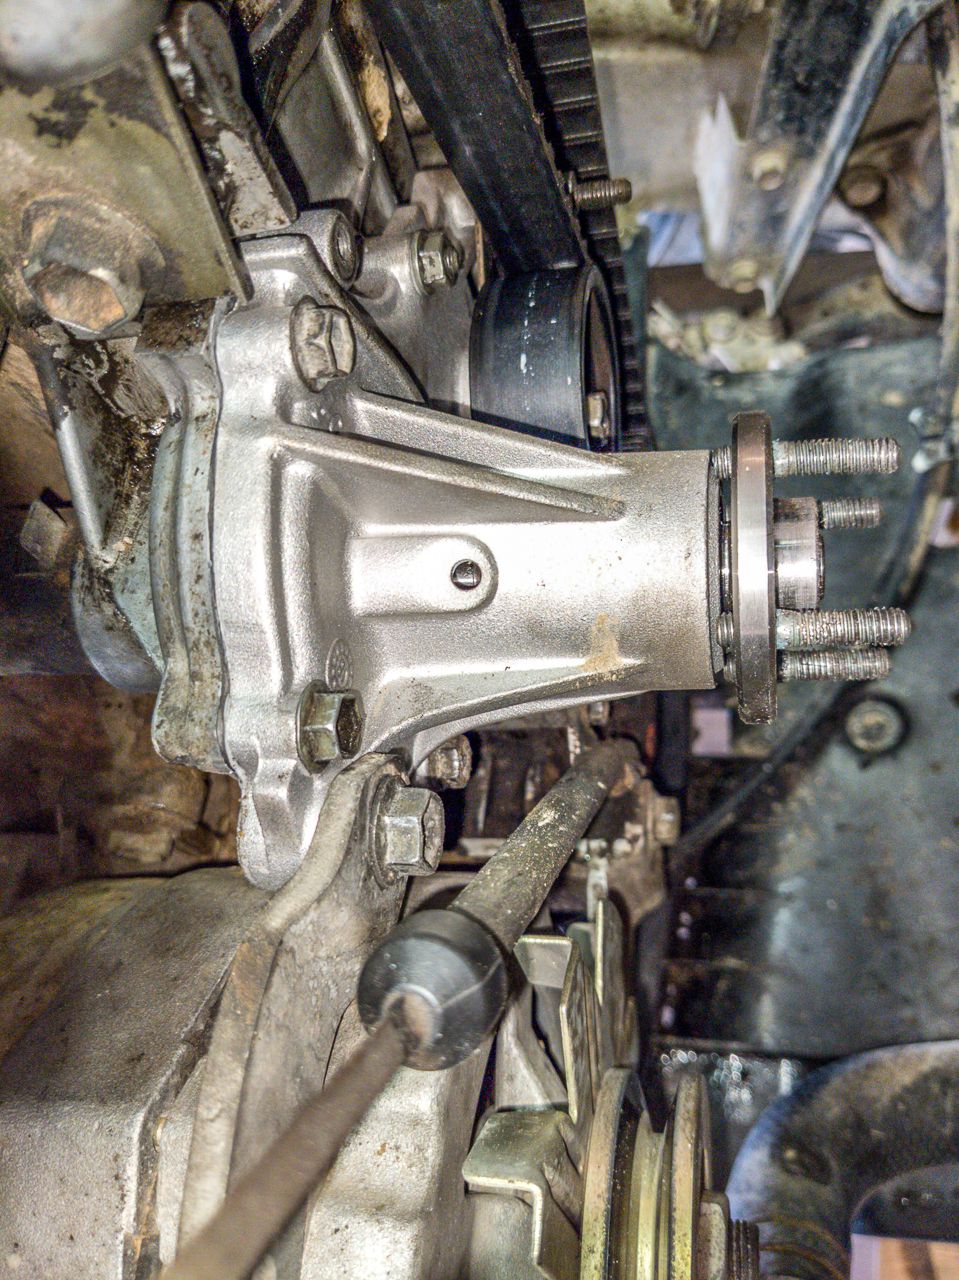
After an examination of the vacuum lines in the engine bay revealed nothing.  I called MikeW, the Samurai Guru in New Mexico and described the symptoms and actions I had to take.  He believes the clutch is worn/glazed and needs replacing.  Sigh.  He first had me check the sheathing on the clutch cable but it was fine.

So, after talking things over with Martha, the plan now is to not go to North Dakota on the way to Wisconsin to check on her Dad; instead driving down to Truth or Consequences in NM and having MikeW help me replace the clutch.  Who am I kidding, I'll be helping him!  He's done the work several times over the years and feels confident in being able to get it done in one evening!

After that, we drive cross country to Wisconsin.  We'll be there for a bit then we'll make our way to Bedford, KY to attend this year's Zookimelt Suzuki Samurai Rally.

The detour to get the Sammy's clutch swapped out adds about 500 miles to our trip itinerary but it doesn't make sense to go through North Dakota and not have a vehicle to drive around in does it?  The original thought and proposal from MikeW was he'd help me do the work during Zookimelt, but this way there's no time lost or imposition made during his "vacation time".

Clutches are wear items so no blaming the Samurai.  I checked the PO's records once more and he didn't have the clutch replaced while in his care.  The Sammy's odometer reads above 92k miles now, of which I think almost 10k is towed miles, so figure 70k miles on the present clutch (PO said it was about 12k towed miles under his care).  Not too bad, probably the original clutch!

Note: The local mechanic gave me a rough quote of $1000-1500 to do the work and while the money is there, not sure when he'd be able to schedule the work.

Friday, May27

Along with RichardM's help, Martha roped in Chris and Lori Z of Blazeourway to help diagnose what we now believe is a fuel delivery issue on the Sammy.

Several test rides were done, each after a mod was made to see if it remedied the bogging down issue:

Isolate the Deceleration Mixture Control Valve.  I capped off the valve's vacuum line with a known clogged jet and capped the air line from the valve into the intake manifold.  No joy, bogging symptoms persisted.

Bypass the mechanical fuel pump.  Known to have issues before, which is why the Sammy has an electrical fuel pump.  Instead of the fuel flowing from the electrical fuel pump AND through the mechanical pump, I used fittings to link the fuel line from the electrical fuel pump and the fuel line leading to the carburetor.


After ensuring no leaks with the fuel pump running, I took her out for test drives.  No joy, bogging still occurred.  

I even tried rerouting the fuel line further away from the manifold area, thinking heating of the gas might be an issue.  No joy, bogging still occurred within an hour, sometimes less of me driving around.

I did notice though, during the drives, that whenever the bogging down conditions occurred; I could pull over, shut down the ignition, turn it back on and the Sammy would be back to its normal responsiveness....no more bogging!  Until the next time that is but still, a work-around at the very least.

At first, I thought the turning off/on of the ignition was resetting something in the ECM: Electronic Control Module, which regulates fuel flow in the carburetor.  But the fact that the change was immediate basically eliminated that, I was told, by MikeW.  It would, you see, take time for the electronic bits in the ECM to cool down.  So, at this time, no need to hunt for a replacement.

The thinking now is that debris is being sucked up against the filter used by the gas pickup tube inside the tank.  By turning the ignition off, I turn off the fuel pump, fuel flows back into the tank and pushes away debris from the filter.  The debris then floats around till it gets sucked up again against the pickup tube's filter and blocks fuel flow, starving the carburetor and causing the bogging down conditions.

So, currently, the plan is to:

Drain the gas from the gas tank ( If there's a lot of debris, then also drop the tank, remove the pickup tube and clean it and its filter out.  Perhaps even roll some old nuts/bolts inside with some old gas, to further clear out gunk that might be in the tank.

More to follow.


Friday, May 13, 2022

Spoke too soon after the Sammy's Successful Torture Run: Water Pump Failure

 Should have kept my mouth shut and not incurred the wrath of the gods of things mechanical....

Yesterday, Thursday, May 12

I'd just taken Thing One to work with the Sammy and had returned home noting that the engine seemed to be overheating a bit.

Once I got out of the car, it was obvious why.  There was a noticeable amount of coolant coming out of the water pump area, to include the weep hole.  I believe this means that the seal keeping coolant out of the front part of the pump had failed at the very least!  Dammit.

I'd been, for quite a while now, been carrying a new spare water pump.  I forget to original reason I bought it as a spare, but now was happy to have it on hand.  Not too expensive, somewhere around $50 I dimly recall.  

So there it was, 3:30 PM in the afternoon and I started tearing things down to get at the failed water pump.

As expected, its quite the PITA to get a 10 mm wrench on the four nuts holding the fan onto the fan pulley though its removal along with the radiator shroud is pretty much straightforward with some careful positioning.

The shroud and fan out of the way, there was room to get at the crankshaft pulley.  But first, had to loosen the bolts (upper and lower) on the alternator in order to lever it closer to the crankshaft and lessen the tension on the fan belt.  (As the fan is off, just pull the fan pulley off once you've loosened tension, the fan belt comes off easy after that)

Fan pulley removed, along with the fan belt, I tried for a quite a while to loosen the big nut on the front of the crankshaft.  Turns out, you don't have to do this!  After consulting both MikeW and RichardM, my "go to gurus" on things mechanical, I decided to also consult the Factory Service Manual.  (duh....)


So, luckily unsuccessful in loosening the crank timing belt pulley bolt, I removed just the 4 crankshaft pulley bolts and off came the pulley!


Now that the crankshaft pulley was out of the way, I was able to remove the bolts securing the timing cover:

In order to remove the timing belt, you have to loosen the following:
not quite correctly labeled, is it?

It took a bit of fiddling about, but finally loosened the tensioner wheel enough to allow me to slip off the timing belt.  NOTE: At MikeW's strong advice, I marked the top and bottom of the timing belt at both gears so that when the belt went back on, it'd be in the exact same spots!  This is important otherwise you'll throw off the engine timing!  Also, ensure no movement of either the crankshaft or the upper timing gear!

Below pic is for record, note the two springs on the tensioner plate.  One turned out to not do much of anything but resided within the shorter, more robust spring.  Weird.


Timing belt out of the way, I could now access the bolts/nuts securing the failed water pump and off it came:
In case you've ever wondered what a mechanical
water pump looks like on the inside

Spent quite a bit of time at this point cleaning things up, not only for the new water pump's mating surfaces but the area concealed by the timing cover.  There was a lot of crud!

Finally, I used a light coat of Yamabond 4 gasket sealant to secure the new gasket for the new water pump into place and gently installed it onto the two mounting bolts protruding from the engine case.  Next came the remaining bolts, trying to not tighten too tight and in a pattern to distribute the contact evenly.

New water pump in place, it was time to reinstall the tensioner wheel and bracket.  This proved to be quite the PITA.  After much trying (couldn't get the belt onto the tensioner wheel due to tightness of belt) I was able to finally slip the belt on by even more loosening of the bolt holding the tensioner wheel!


A view of the new water pump, with old studs installed using the double-nut method and some blue Locktite, before the timing cover was put back on:


Side view, showing the weep hole on 
the new water pump.

Another for record pic, to show the one spring that I used on the tensioner plate, the other one not seemingly usable.

The rest of the steps were basically in reverse order of how they came off.  Timing Cover, Crankshaft pulley, fan belt and water pump pulley, fan loosely hanging on the four bolts, radiator shroud, then secure mounting of the fan using the four nuts and some Loctite again.

Applied tension on the alternator again and went for a test drive after adding what I thought was what coolant had been lost by the old water pump.  This turned out to be lacking, the engine quickly heated up and stayed close to the MAX mark till I got her home.

Once I was able to, I added what turned out to be almost 1/2 gallon + of new coolant directly into the radiator.  Another test drive showed things working as expected, with the temperature gauge climbing to the 3/4 mark and then dropping to the middle where it remained for the duration of the 15 mile test drive.

This morning, Friday the 13th:

I woke with a start, realizing I'd forgotten to tighten the tensioner stud, the pic below from the service manual is mislabeled but basically it's the stud that's directly above the pushing finger and which seems to be labeled as 1.
In the belief that a loose stud would eventually work itself loose and fall onto the crankshaft timing gear, I started taking things apart yet again after breakfast.

It didn't take me long, the PITA points being once again the nuts holding the fan onto the fan pulley and the bolts securing the alternator.  Once I got to the stud in question, I realized its also the stud onto which a nut mounts to secure the center portion of the timing cover!  So it probably would not have worked itself loose.  Oh well, better to secure it.

In the process, I found one timing cover bolt not tight and figured out an easier way to access the mounting bolt under the alternator. (Use the opposite bolt on the mounting bracket, easier to get to when everything else is mounted).

Now, I know everything is secured and a test drive showed success and still no leakage from the new water pump!

Time will tell, of course, if I did the work properly.  A short test drive showed all was well, no leaks and the temperature gauge needle only climbed to halfway between 1/2 and 3/4 before settling back down to the 1/2 mark.

My grateful thanks to the ever patient and helpful RichardM and MikeW (Sammy Guru in NM), I don't know what I'd do without them both.

Sunday, January 23, 2022

Sammy Maintenance, Engine Coolant Baselining and Minor Fixes

Just a record of some of the work done on the Sammy these last couple of weeks.

Servicing 4WD Locking Hubs:

The passenger side manual locking hub had gotten more and more difficult to turn from the Free to Lock position and back to Free.  Turned out the actual dial mechanism was in need of some oil lubrication.  The insides were clean and still lightly greased.  Cleaned off the old grease and applied new coat and re-assembled.

left to right: left hub cover, left hub, right hub cover, right hub

Gear Oil using components check:

Checked and topped off the Sammy's transmission with about 3 ounces of  80w90 Gear Oil before it started coming out of the inspection hole on its right side.  Rear differential needed less than 1 ounce, front different didn't need any and finally the transfer case required perhaps 2 ounces before fluid dribbled out of the inspection hole.

Cooling Performance Baselining:

After rigging a downstream overflow bottle for the coolant reservoir, I tracked over several drives, the temperatures at several points on the Sammy's engine to ascertain baseline figures when things seem to be running within cooling specifications.

I also have quite taking said fluid from the overflow bottle and putting it back into the radiator.  The stock reservoir you see, remains at the full mark, so I know there's coolant that can be drawn back into the radiator as needed.  So far, after three separate drives, all coolant levels remain stable.

Here's the points on the engine I'm monitoring with a touchless thermometer each time I stop and park after driving it for at least 5 miles and having seen the temperature gauge on the dash panel stabilize in the middle of the gauge's range.

Note: Image source is partsouq.com, I removed some items from their diagrams to clearly show where the measurement points are located.


The two empty bolt holes on the left forward edge of the cylinder head.
Average: 177°F (highest: 190°F)for upper hole
Average: 222°F (highest:234°F) for lower hole.
The gasket you see above is the head gasket which I'll be eventually replacing.

Empty bolt hole on the engine block itself, forward left corner.
Average temperature 197°F (225°F)


The intake manifold's second intake tube
Average temperature 144°F (highest 166°F)

The coolant thermostat's cover 
Average temperature 197°F (highest 209°F)

Defrost Vent: No air flowing from driver side vent

Last couple of times I'd actually felt like turning on the heater on in the Sammy and setting it to defrost the windshield; I'd noticed no air flow on the driver side.  Not good as ice would form of course.  Each time it had happened I'd had to wipe things down with a paper towel.

Today, I got around to seeing where the problem was, it turned out to be a simple issue:  The feed tube from the heater up to the vent had been knocked off somehow:


So glad it was an easy fix.....I'd started the diagnosis thinking of how I'd have to contort my body to get at things behind the dashboard!  Someday I've got to trace and tidy up the mess of wires you see.  I believe most are involved with the radio.