Tuesday, May 31, 2022

Two-Wheeling across the Dakotas - Day 1 (Nebraska)

 Martha and I left the cesspool that is the Metro Denver area and headed northeast towards Nebraska using I-76.  This trip, we're trailering the TW200 and Martha's Stewart (Stewie) Genuine Buddy 125 Scooter!

Soon enough, we were on state highways, heading almost directly north, paralleling the border of Nebraska and Wyoming.  The weather was overcast and it sprinkled on us a couple of times, with them temperatures staying mostly in the low to mid-fifties.

The terrain was flat plains with small rolling hills at first, then some sandstone looking bluffs as we approached and passed Scottsbluff, NE:

photo courtesy of Martha

Our campsite destination for this first day of a month long+ trip was the City Park in Crawford, NE.  There's four camping spots with electric and water for $20.  Since we left home with an empty fresh water tank, hoping for better MPG (8.2), we chose one of the 4 spots instead of the "primitive spots" available.  


After dinner, Martha decided we should go for a ride to get a picture of the "giant chicken" she'd spotted from the gas station where I tanked up the VRRV.  $4.29/gallon with a $6 convenience fee for using a credit card.  

Martha sez: I'm no Chicken!

The view from the Mexican Canyon Trailhead


All of the buildings were closed by the time we got to Fort Robinson so we contented ourselves with checking out some information signs and peeking through some windows.


Marker of the site where Crazy Horse was wounded
and later died.

After touring the fort, we rode over to the Buffalo Display area.  I didn't have my real camera with me so all I can show you is my Pixel4 phone's results.


We were getting a bit chilled by now, and we rode back to the campsite.  I loaded the scooter and T-Dub back onto the trailer with no issues.  The rest of the evening was spent warming up inside the camper.  Tomorrow:  The Badlands of South Dakota.

Sunday, May 29, 2022

Carburetor Issues dictate a Hiatus for Sammy Repairs

First, my thanks to RichardM, Lori and ChrisZ and of course MikeW (Sammy Guru in NM) for their time and knowledge/advice given while trying to troubleshoot remotely the fuel delivery issues encountered on the Sammy recently.

Bottom line, it looks like fuel is now flowing reliably to the carburetor but not making it into the fuel bowl.  No fuel in the bowl, means fuel starvation.  This of course means it bogs down on acceleration.  

Leading up to the determination of the above condition:

Drained/Dismounted the Sammy's gas tank, verified interior was pristine, very little debris (no larger than grains of sand) found in drained gasoline.  

Replaced a failed electric fuel pump, the theory was intermittent failure was causing the fuel starvation issues, but alas, probably not.  It had still made the noise of functioning but apparently, no flow.

The stock carburetor on the Samurai, is a Hitachi DFB306-832 and is quite the complicated beast. A shining example of the complex and in the long term futile efforts to do emissions control back in the late 80's on carbureted cars.

cost for refurbed version: $200-300

Now add the plethora of vacuum lines, coolant tubes and solenoid wiring and it makes for quite the complex POS.

I will not be having someone work on the carburetor, nor will I get another one to replace the existing one.  No sense getting another complex and probably unreliable carburetor!

Instead, the plan is to remove the stock carburetor and put in a simpler more modern carburetor, known as a Toyota 3K.  One without a single emissions control related feature, but which passes emissions testing of course since that's mandated in the area I live in: Metro Denver Cesspool.  

Not a single vacuum line, solenoid or sensor!
Cost: < $100

Another great benefit to swapping the carburetor is that the Sammy will no longer have ANY use for the ECM: Electronics Control Module.  They deteriorate with age, are no longer made, and one has to hope to find a good used one when needed.  The Sammy will NOT run with a bad ECM even if the carburetor is fine.

The swap will probably happen in August after Martha and I return from our summer vacation trips.  I'll tow the Sammy to New Mexico and MikeW will do the install and I'll stress test it for a while.  MikeW, the Sammy guru, describes the stock carburetor as "a nightmare".  He won't work on them, instead, when his fails, he'll put on the same type of simpler carburetor he will put on my Sammy.

So, different vehicles will be taken on the upcoming camping trip with Martha, tune in to find out.

Thursday, May 26, 2022

Pikes Peak Views and the Sammy now experiencing fuel delivery issues. (was needs a new clutch)

 Wednesday, May 25

A windy day, which made things a bit brisk as I drove the Sammy south of the town of Parker, CO and past the Castlewood Canyon State Park.

I'd originally planned on checking out the hiking trails within this park but the steady winds convinced me that the hiking would be too chilly.

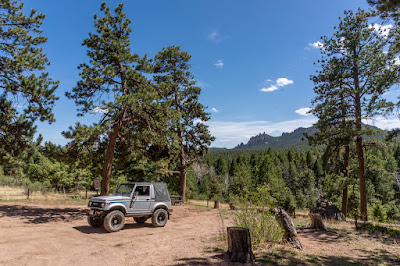
Instead, I drove a bit further south and got pictures of the Sammy with Pikes Peak in the background:

On the side of State Highway 83

I then moved the Sammy north a bit to County Rd 80 and found a better angle on Pikes Peak:


No mechanical issues encountered with the Sammy, I was happy.

Thursday, May 26

Glorious day today in terms of weather, sunny and warm with very gentle breezes.  Drove the Sammy to Rampart Range Road by way of Jackson Creek Road off of CO Hwy 105.  It is a much shorter drive than the normal driving to the north end of Rampart Range Road using CO Hwy 67.

The Sammy was doing great until about 3 hours or so into the ride.  Then, she acted like she had no power, especially on uphill portions of the road.  I thought it might be a dirty air filter so I swapped it out for the spare I carry.  This seemed to be the solution for about another few miles but then the lack of power/hesitation returned.

I was having to really drive up the RPMs to maintain headway, and definitely to get her moving while in first gear.  I continued to fixate on it being a possible air leak/vacuum leak issue but found nothing untoward during the couple of times I stopped to check in with RichardM.

Got her home after negotiating starts from stops in the following manner:  Rev up the engine and hold higher revs than normal for first gear while letting out the clutch.  The Sammy would kind of slowly move forward for a bit and then something would "catch" and she'd move out as normal except of course faster since I had the revs up.

I was "premature" in thinking it was a clutch issue.  The info I gave MikeW led us down the wrong path it seems.

After an examination of the vacuum lines in the engine bay revealed nothing.  I called MikeW, the Samurai Guru in New Mexico and described the symptoms and actions I had to take.  He believes the clutch is worn/glazed and needs replacing.  Sigh.  He first had me check the sheathing on the clutch cable but it was fine.

So, after talking things over with Martha, the plan now is to not go to North Dakota on the way to Wisconsin to check on her Dad; instead driving down to Truth or Consequences in NM and having MikeW help me replace the clutch.  Who am I kidding, I'll be helping him!  He's done the work several times over the years and feels confident in being able to get it done in one evening!

After that, we drive cross country to Wisconsin.  We'll be there for a bit then we'll make our way to Bedford, KY to attend this year's Zookimelt Suzuki Samurai Rally.

The detour to get the Sammy's clutch swapped out adds about 500 miles to our trip itinerary but it doesn't make sense to go through North Dakota and not have a vehicle to drive around in does it?  The original thought and proposal from MikeW was he'd help me do the work during Zookimelt, but this way there's no time lost or imposition made during his "vacation time".

Clutches are wear items so no blaming the Samurai.  I checked the PO's records once more and he didn't have the clutch replaced while in his care.  The Sammy's odometer reads above 92k miles now, of which I think almost 10k is towed miles, so figure 70k miles on the present clutch (PO said it was about 12k towed miles under his care).  Not too bad, probably the original clutch!

Note: The local mechanic gave me a rough quote of $1000-1500 to do the work and while the money is there, not sure when he'd be able to schedule the work.

Friday, May27

Along with RichardM's help, Martha roped in Chris and Lori Z of Blazeourway to help diagnose what we now believe is a fuel delivery issue on the Sammy.

Several test rides were done, each after a mod was made to see if it remedied the bogging down issue:

Isolate the Deceleration Mixture Control Valve.  I capped off the valve's vacuum line with a known clogged jet and capped the air line from the valve into the intake manifold.  No joy, bogging symptoms persisted.

Bypass the mechanical fuel pump.  Known to have issues before, which is why the Sammy has an electrical fuel pump.  Instead of the fuel flowing from the electrical fuel pump AND through the mechanical pump, I used fittings to link the fuel line from the electrical fuel pump and the fuel line leading to the carburetor.


After ensuring no leaks with the fuel pump running, I took her out for test drives.  No joy, bogging still occurred.  

I even tried rerouting the fuel line further away from the manifold area, thinking heating of the gas might be an issue.  No joy, bogging still occurred within an hour, sometimes less of me driving around.

I did notice though, during the drives, that whenever the bogging down conditions occurred; I could pull over, shut down the ignition, turn it back on and the Sammy would be back to its normal responsiveness....no more bogging!  Until the next time that is but still, a work-around at the very least.

At first, I thought the turning off/on of the ignition was resetting something in the ECM: Electronic Control Module, which regulates fuel flow in the carburetor.  But the fact that the change was immediate basically eliminated that, I was told, by MikeW.  It would, you see, take time for the electronic bits in the ECM to cool down.  So, at this time, no need to hunt for a replacement.

The thinking now is that debris is being sucked up against the filter used by the gas pickup tube inside the tank.  By turning the ignition off, I turn off the fuel pump, fuel flows back into the tank and pushes away debris from the filter.  The debris then floats around till it gets sucked up again against the pickup tube's filter and blocks fuel flow, starving the carburetor and causing the bogging down conditions.

So, currently, the plan is to:

Drain the gas from the gas tank ( If there's a lot of debris, then also drop the tank, remove the pickup tube and clean it and its filter out.  Perhaps even roll some old nuts/bolts inside with some old gas, to further clear out gunk that might be in the tank.

More to follow.


Tuesday, May 24, 2022

Miscellanea .... A Ride for Brigitta, the Sammy loses her new Oil Pressure Gauge and gains a Windjammer Clone.

In an effort to get some miles onto Brigitta's (my '87 R80 Beemer) odometer, I rode her all the way to the Hugo State Wildlife Area.  This was on Monday, May 16.  

It would prove windier than expected, especially while moving at 75 mph eastbound on the I-70 Super Slab towards the town of Limon, CO!  I had to go, several times, into "dancing in the winds" mode as gusts would hit me from the front right quarter mostly.

Still, got there OK, and discovered that a third of the SWA is now off limits, the southern third to be exact.  Not reason found except a sign stating the road leading to the southern campsites was now closed to all but "authorized" traffic.

Incoming weather had clouded up what had started as bright blue skies; so the pictures taken didn't turn out.

I returned via CO Hwy 74 into Colorado Spring's eastern suburbs, through the small town of Black Forest and finally onto CO Hwy 83.  A total of 256 miles ridden, and boy was I tired at the end of it!  I'm thinking my days of long distance riding on motorcycles, whether two or three wheeled, are coming to an end.

--------

The Sammy's new water pump continues to work fine.  The new normal, in terms of the temperature gauge on its dash, is for the needle to slowly climb towards the midpoint as the engine warms up and stay there.  No more going all the way to the 3/4 mark before then lowering to the middle and staying there for the rest of a drive.

---------

I went to the RV storage yard with a small air compressor and blew out the water lines on the VRRV.  We were expecting cold temperatures Friday/Saturday of this week you see.  A very late Winter storm had caused a Winter Weather warning to be issued to the Front Range.

Update: not much snow accumulation resulted in the Front Range.  Heavy, wet stuff that cause some tree damage as branches were overloaded and broken off.

---------

Spent a lot of time cleaning off the dirt and crud that had built up due to the failing old water pump.  Got a lot of dirt off the underside of the Sammy as well.  Of course, in the midst of doing this, I "improved" the routing and securing of the plastic tubing used by the oil pressure gauge I'd recently mounted.

This "improvement" proved fatal to the gauge's continued presence inside the Sammy.

Yesterday, I was returning from a short drive and had backed the Sammy into the garage intending to work on installing a plastic sheet behind the driver compartment (beginnings of Windjammer Clone)

To my dismay, I saw a trail of oil on the driveway and into the cul-de-sac as well!  Hastily shutting down the engine, I looked underneath the Sammy and there was oil pouring from the engine compartment and smoke was evident from burnt oil when I opened her hood.  Dammit.

Yep, the oil tube had worked itself loose and had come to rest against the hot edge of the exhaust manifold shield.  Melted of course, and had been spewing engine oil all over.

After unsuccessfully trying to replace the plastic tubing with brass tubing from a kit I'd prepurchased, I gave up and removed the oil pressure gauge and components.  The sandwich oil filter adapter remains, but all four ports are sealed now.  I'll probably remove the sandwich adapter next time I change the oil on the Sammy.

Needless to say, the spilled oil made quite the mess.  I spent most of the evening and part of next morning cleaning things up both on the Sammy and the driveway.

I also spent some time this week learning how to use a steamer to "shape" a straw hat I'd bought years ago.  What do you think?

Sunday, May 22

Spent most of the morning finishing the attachment of a homemade version of a Bestop Windjammer on the Sammy.  It basically mostly seals off the driver/passenger compartment 

Windjammer by Bestop
Image source: Amazon

In My opinion, the above clone actually does a better job of keeping the dust out than the actual Windjammer produced by Bestop.  It's a much quieter ride now.  The window is clear Plexiglas, and while a bit red-neck, the black Gorilla Tape should hold things secure.

Here's how she looks now, in Safari Top mode:


Saturday, May 14, 2022

Dealing with a Tight Soft Top and a couple of New Stickers

Now that the Sammy appears to be willing to be operational, it was time to do some other things for her.

Some of you were aware that the Sammy sported a sticker on the spare wheel which read:  "0 to 60, Eventually".  Something to perhaps give clueless drivers a hint that perhaps the Sammy doesn't accelerate as fast as normal traffic.

Today, I decided to remove it and try this one on to provide the occasional idiot a clue.  I also added a 4x4 oriented sticker as well, see if you can spot it.


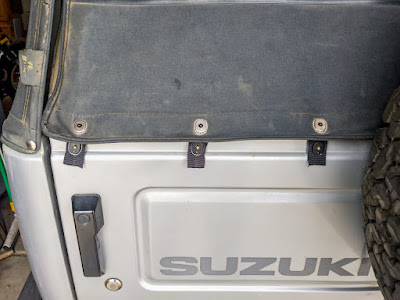
Now, those of you who've had cars with soft tops, know that they're a pretty tight fit to start with; and almost impossible to attach all the fasteners.  In the Sammy's case, it's always been the ones securing the rear window.

As you can see, close but no cigar, unless one leaves the soft top under a hot sun for quite some time to soften things up.


Enter the solution which I found on the Internet, usually used for canvas covers on boats.  I'd used something similar to secure the rear clasps on the sidecar's tonneau cover for Scarlett.


I'd bought from Amazon ten sets of the above Lift-the-Dot fasteners.  They arrived today and I made up four extender straps.


In case you're wondering, the fourth one is on the right edge of the window.

Since the zippers for the rear window are shot/useless, being able to secure the four anchor points on the tailgate keep the window in place and not flapping.

I know, I know, I said something nice about the Sammy after the recent torture drive and she responded with a blown water pump.  You're probably thinking I'm just asking for more trouble.  We shall see.

May 15 Update:  Two long drives so far since this post first published, no issues!

Friday, May 13, 2022

Spoke too soon after the Sammy's Successful Torture Run: Water Pump Failure

 Should have kept my mouth shut and not incurred the wrath of the gods of things mechanical....

Yesterday, Thursday, May 12

I'd just taken Thing One to work with the Sammy and had returned home noting that the engine seemed to be overheating a bit.

Once I got out of the car, it was obvious why.  There was a noticeable amount of coolant coming out of the water pump area, to include the weep hole.  I believe this means that the seal keeping coolant out of the front part of the pump had failed at the very least!  Dammit.

I'd been, for quite a while now, been carrying a new spare water pump.  I forget to original reason I bought it as a spare, but now was happy to have it on hand.  Not too expensive, somewhere around $50 I dimly recall.  

So there it was, 3:30 PM in the afternoon and I started tearing things down to get at the failed water pump.

As expected, its quite the PITA to get a 10 mm wrench on the four nuts holding the fan onto the fan pulley though its removal along with the radiator shroud is pretty much straightforward with some careful positioning.

The shroud and fan out of the way, there was room to get at the crankshaft pulley.  But first, had to loosen the bolts (upper and lower) on the alternator in order to lever it closer to the crankshaft and lessen the tension on the fan belt.  (As the fan is off, just pull the fan pulley off once you've loosened tension, the fan belt comes off easy after that)

Fan pulley removed, along with the fan belt, I tried for a quite a while to loosen the big nut on the front of the crankshaft.  Turns out, you don't have to do this!  After consulting both MikeW and RichardM, my "go to gurus" on things mechanical, I decided to also consult the Factory Service Manual.  (duh....)


So, luckily unsuccessful in loosening the crank timing belt pulley bolt, I removed just the 4 crankshaft pulley bolts and off came the pulley!


Now that the crankshaft pulley was out of the way, I was able to remove the bolts securing the timing cover:

In order to remove the timing belt, you have to loosen the following:
not quite correctly labeled, is it?

It took a bit of fiddling about, but finally loosened the tensioner wheel enough to allow me to slip off the timing belt.  NOTE: At MikeW's strong advice, I marked the top and bottom of the timing belt at both gears so that when the belt went back on, it'd be in the exact same spots!  This is important otherwise you'll throw off the engine timing!  Also, ensure no movement of either the crankshaft or the upper timing gear!

Below pic is for record, note the two springs on the tensioner plate.  One turned out to not do much of anything but resided within the shorter, more robust spring.  Weird.


Timing belt out of the way, I could now access the bolts/nuts securing the failed water pump and off it came:
In case you've ever wondered what a mechanical
water pump looks like on the inside

Spent quite a bit of time at this point cleaning things up, not only for the new water pump's mating surfaces but the area concealed by the timing cover.  There was a lot of crud!

Finally, I used a light coat of Yamabond 4 gasket sealant to secure the new gasket for the new water pump into place and gently installed it onto the two mounting bolts protruding from the engine case.  Next came the remaining bolts, trying to not tighten too tight and in a pattern to distribute the contact evenly.

New water pump in place, it was time to reinstall the tensioner wheel and bracket.  This proved to be quite the PITA.  After much trying (couldn't get the belt onto the tensioner wheel due to tightness of belt) I was able to finally slip the belt on by even more loosening of the bolt holding the tensioner wheel!


A view of the new water pump, with old studs installed using the double-nut method and some blue Locktite, before the timing cover was put back on:


Side view, showing the weep hole on 
the new water pump.

Another for record pic, to show the one spring that I used on the tensioner plate, the other one not seemingly usable.

The rest of the steps were basically in reverse order of how they came off.  Timing Cover, Crankshaft pulley, fan belt and water pump pulley, fan loosely hanging on the four bolts, radiator shroud, then secure mounting of the fan using the four nuts and some Loctite again.

Applied tension on the alternator again and went for a test drive after adding what I thought was what coolant had been lost by the old water pump.  This turned out to be lacking, the engine quickly heated up and stayed close to the MAX mark till I got her home.

Once I was able to, I added what turned out to be almost 1/2 gallon + of new coolant directly into the radiator.  Another test drive showed things working as expected, with the temperature gauge climbing to the 3/4 mark and then dropping to the middle where it remained for the duration of the 15 mile test drive.

This morning, Friday the 13th:

I woke with a start, realizing I'd forgotten to tighten the tensioner stud, the pic below from the service manual is mislabeled but basically it's the stud that's directly above the pushing finger and which seems to be labeled as 1.
In the belief that a loose stud would eventually work itself loose and fall onto the crankshaft timing gear, I started taking things apart yet again after breakfast.

It didn't take me long, the PITA points being once again the nuts holding the fan onto the fan pulley and the bolts securing the alternator.  Once I got to the stud in question, I realized its also the stud onto which a nut mounts to secure the center portion of the timing cover!  So it probably would not have worked itself loose.  Oh well, better to secure it.

In the process, I found one timing cover bolt not tight and figured out an easier way to access the mounting bolt under the alternator. (Use the opposite bolt on the mounting bracket, easier to get to when everything else is mounted).

Now, I know everything is secured and a test drive showed success and still no leakage from the new water pump!

Time will tell, of course, if I did the work properly.  A short test drive showed all was well, no leaks and the temperature gauge needle only climbed to halfway between 1/2 and 3/4 before settling back down to the 1/2 mark.

My grateful thanks to the ever patient and helpful RichardM and MikeW (Sammy Guru in NM), I don't know what I'd do without them both.

Thursday, May 12, 2022

Brigitta's Clutch Cable End Breaks, A Torture Run for the Sammy and Sun Visors

 Monday, May 9

I rode out on Brigitta, my '87 R80 Beemer, just for a short run to get some stuff from the VRRV at the storage yard.  All was well until I was on Arapahoe Road heading home.   Then, I went to engage the clutch lever and there was a pop and then no resistance!  Yep, the end of the cable had snapped at the lever.

I was able to get within one mile of home before I could go no further without being able to engage the clutch.  So I parked Brigitta at the corner and started walking down the hill towards home after crossing the busy intersection of Smoky Hill Road and Himalaya Road.  

About a block down, it occurred to me that since I was walking downhill, that I could easily coast downhill with Brigitta!  So I walked back to her, pushed her across Smoky Hill Road at the pedestrian crossing, then mounted and rode her down the hill.  

Got within a half block or so of the house before she lost all momentum, then I pushed her a bit closer before getting Patrick (Thing One) to come out and help me push Brigitta onto the cul-de-sac and into the garage.  

I had a spare clutch cable at home fortunately, so I mounted it after using the old clutch cable as a routing guide.  Got the ends connected; then realized something:


Note, in the picture above, the small grey cap that is the end of the new clutch cable. (red arrow).  This bit is apparently called the nipple.

Seems to be a lot of room inside that cavity huh?  It had also been a remarkably short interval since I last changed out the clutch cable. (Less than 3000 miles).

I suspect, that I didn't realize that what BMW calls a Nipple Holder, is what you mount the end of the clutch cable to, then you insert the nipple holder onto that round cavity under the clutch lever!  Doh!

Nipple Holder

I ordered the parts (replacement clutch cable for spare and two nipple holders) and they came in today and Brigitta is whole once again.

Yesterday, May 11, Wednesday.

I drove the Sammy about 7 of the 8 hours it took to go and wander about the camping sites along Rampart Range Road, in the Rampart Range Riding Area.  The driving was a combination of highway, surface and dirt road driving.  Lots of slow driving from one campsite to the next, checking each out for future usage.  

The view from the Cabin Ridge Picnic Area

I believe this is near the junction of Rampart Range Rd
and Forest Road 507

After returning from the Rampart Range Riding Area, I detoured to Bee Rock for pics:


I would end up returning home via US85 to Castle Rock, then the Crowfoot Parkway to Parker and "enjoy" the stop and go traffic of Parker to Lincoln Avenue and thence homewards via Inspiration Drive and Gartrell Road.

I'm happy to report no issues with the oil pressure gauge leaking at the fitting anymore (I'd tightened it slightly).  It also had no coolant issues even in heavy stop and go traffic with the outside temperature approaching 90 degrees!

I did see the temperature gauge's needle, reach the 3/4 mark on the gauge and a bit beyond three times during the drive.  Each time, the gauge's needle would, after a few seconds, then start to move back towards the middle of the gauge.

After a conversation with RichardM, he suggested perhaps there's air in the coolant system, causing the gauge's behavior but that as long as it drops each time, all should be well.

The Sammy's oil level was about a quart low once I got home (yep, she continues to burn oil) so I topped it off.  The oil pressure gauge never fluctuated so it appears the oil level has to be more than one quart low before it'll affect the oil pressure gauge.  Good info for me to know.  RichardM explained to me that when you see the oil level on the dipstick below the low mark, that means the engine is about a quart low.

Later in the evening, a couple of cheap sun visors I'd ordered from Ebay from a vendor in India arrived.  The finish was "meh" and I had to adjust the placement placement of the mounting holes for the visor to align correctly.  I guess that's what you get when you go cheap.

Still, the Sammy's got visors now, no more starting into the sun in the early morning or late afternoon.


Wednesday, May 04, 2022

An Oil Pressure Gauge for the Sammy

Given:  The Sammy goes through oil.  I think it's being burned and out the exhaust.  (No apparent leaks, which would be preferable)

So, a nearly religious daily pre-trip check of oil levels is required. 

Lately, she "seems" to steady at a bit above low mark on the dipstick.  Hmmm.

So today I added an oil pressure gauge and a Glowshift oil filter sandwich plate adapter that I bought from Amazon.  The Glowshift adapter went on with no issues, though I appear to have stripped one of the four port caps.

Glowshift 3/4-16 Thread Sandwich Adapter

The oil filter sandwich adapter goes between the oil filter mount and the oil filter, providing 4 ports to use for the installation of sensors. Onto one of the ports, I installed this kit:

Dorman 7-153 Kit.

I managed to pinch the tubing from the Dorman kit while feeding it through the firewall on the Sammy, dammit.  So basically I ended up using just the gauge pictured above.  The fittings didn't work right with the tubing I had left over from a previous project.  

After trying to "make it work", gave up and drove to the auto parts store and found this:

Bosch FST 7554

Sadly, the guys at the counter of the auto parts store had no clue, and I just happened to find the above kit while debating buying another oil pressure gauge to obtain access to the tubing/fittings kit that is included!

I had to remove the fitting that came with the Dorman gauge's kit (not compatible) and use the fitting that came with the FST 7554 kit, a little Teflon tape, and voila, a good oil seal!  (Before, large oil leaks!)

I'll monitor the adapter and fittings of course for leaks.  I am a bit leery of the oil tubing used and I'm not sure how durable it is.  I can see an electronic pressure fitting in the Sammy's future, but we'll see.

I went for a short test ride, the oil pressure gauge reports 50 PSI above 3000 RPM.  The Samurai's service manual says oil pressure should be between 42-60 PSI at 3000 RPM.

At idle, the pressure gauge drops down to around 20 PSI, which I believe is normal.

I'm hoping, the use of this oil pressure gauge, will give me a timely warning that the oil level in the engine has dropped too low.  I don't want to rely on the oil pressure sensor that comes with the Samurai, which uses an idiot light to tell you oil pressure is a problem.

NOTE: Though both the Dorman and Bosch tubing kits claimed 1/8 NPT threading, their components are NOT interchangeable!  The tubing for the Dorman kit was slightly narrowed in Outer Diameter than the Bosch Tubing!

Update: Had to bump up the idle from around 900 to 1100 RPM so that idle oil pressure was at least 12 PSI, at 900 it was barely 6 PSI!  Oh, and I found a 2.50 1/8-27 plug at Home Depot for the one I managed to strip while installing on the sandwich adapter, the OEM wanted $15 for two!