Got home yesterday, Monday, and after unpacking the VRRV, set about disassembly the bits that needed to be removed or displaced to access the steering head on Scarlett, my sidecar rig.
Overall, not too difficult though I did run into some issues that I was able to work though with RichardM's help along with other people I consulted via text and email.
First was the removal of the front wheel and front fender so that the forks could be lowered. Also the detaching of the brake caliper and securing it off to the side.
Please refer to the below pic for parts as I list them, if interested.

image source: Ural.com
Part #16, Tightening Nut for top of the forks. Right one came off easy, left one...not so much. Ended up having to use a 36 mm socket and 1/2" drive breaker bar to break it loose. Cause: whomever installed it back in 2014 during the assembly of the bike really buggered it up, causing cross-threading/damage.
Along with Patrick's (oldest spawn) help, I then lightly tapped on the top of the fork tubes and the assembly slid out and we put it out of the way. (Even without the wheel, it's heavy)
I moved the handlebar back onto the gas tank; which I protected with a fender cover cloth.
Let's see, that allowed me to remove the top of the triple tree, part 1. Before I did so though, I removed the right and left hand covers, parts 2 and 4, and moved all the wiring in the headlight bucket area over to the side and out of the way.

View from front, all wiring off to the side as you can see, exposing
the steering head (black tube in center of pic)
My second "chance to excel" came with the tightening nut pictured below which secures the steering stem to the top of the steering head. It was jammed solid. I even went and bought a 42 mm/1-5/8" socket and a breaker bar with 3/4" drive to try and loosen it, all to no avail.

After a somewhat restless night, I woke this morning and while sipping my morning coffee decided on a different approach. I would get my Dremel tool with a cutting wheel (something suggested by RichardM yesterday) and cut a slot into the nut above in order to pry it off.

Here's what the top bearing assembly looked like before I lifted the roller bearings out.

Here's what the top roller bearings looked like. Not good.
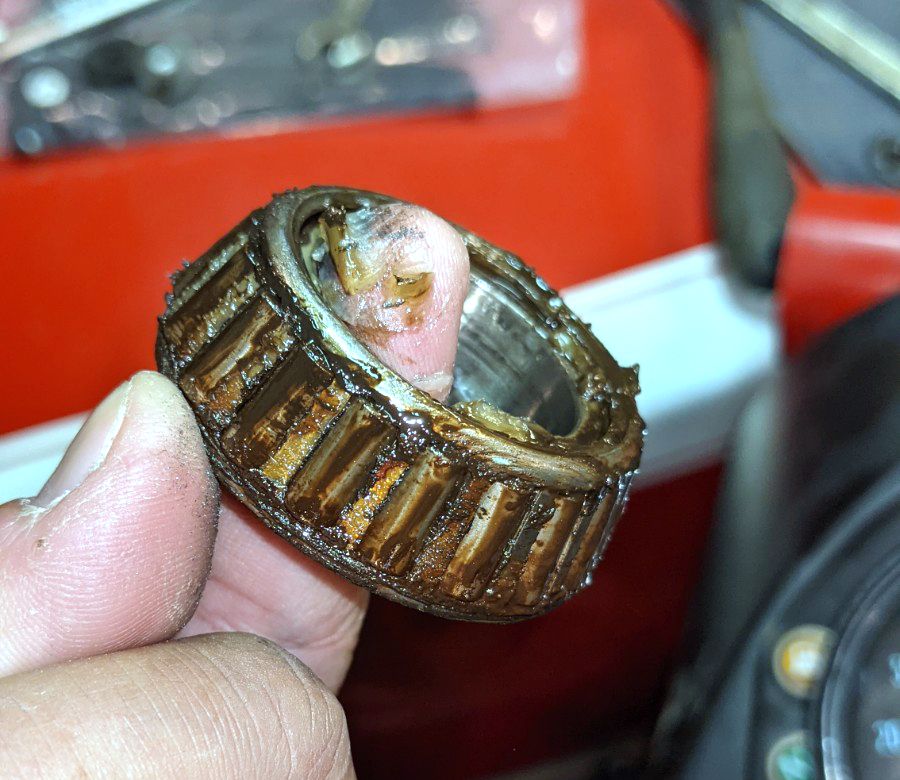
Next was the removal of the pressed-in outer race. This proved to be challenge #3! Again, I ended up using the cutting tool to break it and then was able to pry it off with a large screwdriver. The photo below isn't good enough to show it but there was much "brinneling" on the surface. That's when the roller bearings repeated impact the outer race's inner surface, causing dents eventually.

I did cause some minor damage to the steering head itself but I think it'll be fine to use.


So, I emailed the local Ural dealer in Denver and asked him to get me replacement parts 16, 33 and 34. I already have the new bearings which I got from Amazon: SKF 32006 X/Q.
I got everything cleaned up a bit, put away my tools and now will await the delivery of the parts before installing the new bearings.

6 comments:
I admire your determination to get it done. Stubborn connections are a major pain when you expect to have a smooth disassembly.
Glad you got it all apart.
Being a combination of cheap bastard and stubborn usually isn't good news....got lucky this time.
Ahhh yes, the dreaded head bearings. I have a stack of TDubs in the shop waiting for head bearings as the stock ones are plastic and don't stand up well to hard braking and frequent drops induced by students (and one instructor/mechanic in particular). One must have patience and time, I usually talk to the bikes letting them know that I have an entire tool chest full of tools and I'll start small, it's up to them how big a tool I I eventually use.
Thanks Troubadour for the comments. Plastic bearings? Yikes.
Sorry, I should have said plastic housing/keepers.
https://farm8.staticflickr.com/7291/8724239185_a07d4643ce_b.jpg
Thanks for the clarification Brad, still, plastic races....
Post a Comment