The rubber donut is how the output shaft of the transmission, mates to the drive shaft that goes into the final drive for you non-Uralisti. It's part number 2 in the diagram below, you can see why its called the donut right?
source: imz-ural.com
I would be replacing the assembly labeled as 13 in the picture above. This would give Fiona a drive shaft with coarse splines vice the old fine ones which are reputed to strip out easily.
Parts 4-6 came assembled. Part 7 gets mounted onto part 1, forward (closer to the gearbox) of the splines. Part number 8, which helps keep part 1 in place when mounted onto part 8, was positioned in the middle position.
On the final drive side, I had to replace the final drive bearing nut (came with new seal) since the updated drive shaft is of a different size. Assembly #16 below:
source: imz-ural.com
Disassembly was pretty straightforward, thanks to this video put out by Gobium of SovietSteeds, aka Van Le. LINK. You have to remember the final drive bearing nut is reverse threaded in order to remove it.
The old shaft assembly used the castle nut/cotter pin method to secure
the wedge bolt, which secures the shaft to the final drive gear.
The end of the old wedge bolt was flush with the assembly.
A view of the fine splined shaft's connection to the yoke
that goes into the donut.
View of the new drive shaft's coarse splines, tougher hopefully
than the fine splines.
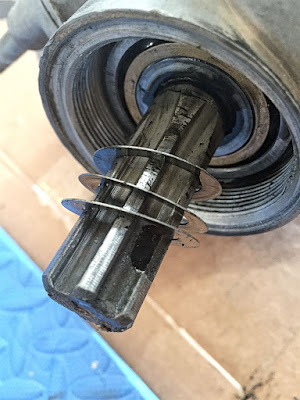
Fiona's FD came with three shims as shown above.
I reused these with the new drive shaft.
I made a note to make sure I put the side of the new wedge bolt
with the tapered cut facing the FD.
Once you've got the new u-joint and bearing nut in place and tightened, you insert the wedge bolt with tapered side facing the FD gear and tap it into place You insert it so that the threaded end finishes opposite the raised end shown in the above picture.
The new u-joint assembly mated onto the final drive and secured by the new
bearing nut, note how I made sure the end of the wedge bolt is flush or damn near.
The new drive shaft assembly uses a Nyloc nut to hold the
wedge bolt in place.
I'll be cleaning up the old drive shaft assembly and parts and keep it as a "get me home" spare. Now all I need is the repaired gearbox (its awaiting delivery of better rear bearing for input shaft) and I'll be ready to put Fiona back together and on the road once again.


4 comments:
In one of the photos you said fine splines when I assume you meant coarse splines. If the shims on the bearing determine how the gears mesh in the final drive, you may want to check how the final drives gears mesh. Unless the bearing itself wasn't changed. Not exactly I sure what individual pieces were replaced.
How much longer on the transmission and was there any guess as to why the input bearing failed?
RichardM, I checked the rotationafter I put the new stuff on, seemed OK. Bearing has NOT changed, but the bearing nut had to change because of the circumference of "dust shield" that's part of the assembly that slides onto the FD gear. Hope that makes sense.
Basically, I replaced assembly 13 in the first parts picture and assembly 16 in the second picture.
If one of the gears was changed, I would definitely check the back lash within the final drive. Incorrect backlash could destroy the gears pretty quickly. The shims are how the backlash is adjusted. I don't know what the spec is.
Yep, except no gears were changed here. Should be good.
Post a Comment