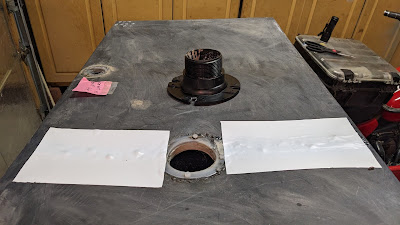
A couple of days ago, after a test fill, there was still water splashing out of the black water tank's top side.
It was time to take the tank off to see what was going on. Dammit.
First though, I removed the toilet to see what could be seen from within the VRRV:
This black fitting secures the toilet to itself and the floor of the VRRV. Interestingly, its a fitting which is readily available at Home Depot.
So I spent a delightful afternoon removing the tank from the underside of the VRRV. It required cutting the plumbing at two points (could have done it in one had I given it further thought).
I got the tank out though, minimal cursing and no blood letting aside:
There's also Eternabond tape shoring up the underside of the cracks within the tank itself. I also placed Eternabond tape on the topside as further sealing and reinforcement. Note: The JBWeld had attached and hardened rather nicely overnight.
Yesterday, Friday November 21
Started the installation of the repaired water tank at mid-morning. Things went pretty well but some minor issues were encountered.
Once the tank was in place and secured, the toilet flange's threads wouldn't reach the threads in the top of the tank! Luckily, I found an adapter at Home Depot which extended the reach of the flange enough, though instead of a threaded seal, it was now sealed with Gorilla Glue Sealant. Should be fine.
I had fortunately picked up appropriate Fernco connectors to rejoin the sections of pipe I had cut to make the removal of the holding tank easier. The flexibility of such connectors allowed me to reconnect sections with little effort. The connectors are the rubber tubes with worm gear clamps.
Today, DEC 21
After a quick leak test on the driveway at home, after putting 6 gallons in both gray and black tanks, things looked good.
I then drove the VRRV to Buckley SFB's FamCamp and did further testing for leaks while flushing both tanks. I had also gotten a water meter from Amazon and determined that I was right, they'd increased the throughput of the water faucet at the dump station! It recorded a flow of 12 gallons/Minute! No wonder there'd been water splashing out the top of the tank.
Anyways, things are good to go for now, we'll see how long things last.
Hopefully, there's no part 3 to this subject.


2 comments:
A pretty ambitious project!
Didn't want it to be a delay on any possible camping opportunities, RichardM! Taking it to an RV repair shop would probably have involved weeks, and an exact match didn't show up after a couple hours of searching.
Post a Comment