Tuesday, December 31, 2024

Happy New Year and 2024 in Pictures

Here's hoping 2025 is a great year for you and yours!

Another trip around the sun, to paraphrase the title of a Jimmy Buffett song.  

Here's a compilation of photos from this past year, 2024.

Motorcycle mileages:

Brigitta (1987 BMW R80): 103370, 410 miles. up from last year's 231 miles, but still a sad state of affairs.

Yagi (2006 Yamaha TW200): 22110, 1954 miles. down from last year's 2295 miles.

Scarlett (2014 Ural Patrol): 1189 km or 713 miles, down from last year's 1187 miles.  She'd been relegated to just hometown driving.  Now, she'll be the spare when the Honda CRV isn't camping with me.  Heir and a spare, don't ya know.

Days Camping:

178 days (49% of year), down from last year's 240 days (65% of year).  Downtime caused mostly by Yagi being deadlined for a bit and also being home to attend medical appointments and such.

Umarang the VRRV:  11906 miles, up from last year's 10438 miles.

Monday, December 23, 2024

Merry Christmas!

Wishing you and yours a very Merry Christmas...

From past Christmas Posts:


Snow Globe images courtesy of Google's Gemini Image Creator A.I.


Saturday, December 21, 2024

Umarang's Black Water Tank Repairs, Part 2

A couple of days ago, after a test fill, there was still water splashing out of the black water tank's top side.  

It was time to take the tank off to see what was going on.  Dammit.

First though, I removed the toilet to see what could be seen from within the VRRV:

This black fitting secures the toilet to itself and the floor of the VRRV.  Interestingly, its a fitting which is readily available at Home Depot.

At first, I thought a locking ring had broken, which
linked the toilet to the tank.

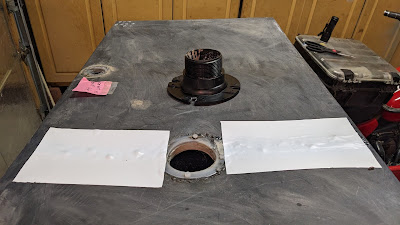
Took a while and a heated socket before I could remove the four bolts shown above.  The problem then was clear, big cracks atop the tank.  Note the alignment of the tank's hole to the hole in the VRRV's floor.

I believe Jayco, the manufacturers of the RV, didn't drill the hole in the RV floor in quite the right spot, which explains why the fitting's mounting points were all on one side!

So I spent a delightful afternoon removing the tank from the underside of the VRRV.  It required cutting the plumbing at two points (could have done it in one had I given it further thought).

I got the tank out though, minimal cursing and no blood letting aside:

Yep, pretty large cracks. 

I believe the cracks were caused when the tank dropped down earlier this month, since the toilet flange screws onto the large hole atop the tank, it didn't want to release upon the tank's dropping; eventually pulling out when the cracks occurred.  Sigh.

After some cleanup, I used wire mesh and JBWeld Plastiweld/Bonder along with staples to provide mechanical support to seal the cracks.


Below, you can see the toilet flange which attaches to atop the tank from within and secures the toilet as well.  I had it in place to line things up hopefully as the JBweld dried and cured.


The strap was to ensure the toilet flange was straight
up and down as things cured.

There's also Eternabond tape shoring up the underside of the cracks within the tank itself.  I also placed Eternabond tape on the topside as further sealing and reinforcement.  Note: The JBWeld had attached and hardened rather nicely overnight.

Yesterday, Friday November 21

Started the installation of the repaired water tank at mid-morning.  Things went pretty well but some minor issues were encountered.

Once the tank was in place and secured, the toilet flange's threads wouldn't reach the threads in the top of the tank!  Luckily, I found an adapter at Home Depot which extended the reach of the flange enough, though instead of a threaded seal, it was now sealed with Gorilla Glue Sealant.  Should be fine.

I had fortunately picked up appropriate Fernco connectors to rejoin the sections of pipe I had cut to make the removal of the holding tank easier.  The flexibility of such connectors allowed me to reconnect sections with little effort.  The connectors are the rubber tubes with worm gear clamps.


I didn't use ABS cement to seal the black water tank's outlet to the dump gate assembly.  This way, removing it is doable hopefully without damaging things.  Hopefully, I never again have to do it but you never know.

This bit took a while to line up correctly, and I had to remove an unused PVC pipe that was in the way of the dump gate now.  The removed PVC pipe was unused storage for sewer pipe.  You can see the cut off end, on the left side of the pic below.

Once I got things lined up correctly, and straps adjusted, everything seems pretty secure.  

Today, DEC 21

After a quick leak test on the driveway at home, after putting 6 gallons in both gray and black tanks, things looked good.

I then drove the VRRV to Buckley SFB's FamCamp and did further testing for leaks while flushing both tanks.  I had also gotten a water meter from Amazon and determined that I was right, they'd increased the throughput of the water faucet at the dump station!  It recorded a flow of 12 gallons/Minute!  No wonder there'd been water splashing out the top of the tank.

Anyways, things are good to go for now, we'll see how long things last.

Hopefully, there's no part 3 to this subject.

Monday, December 16, 2024

Remounting Umarang's Black Water Tank and Misc.

So there I was last week, trying to drain the black and gray water tanks on Umarang, the VRRV, a couple of cold days and nights after returning home from New Mexico.

The dumping of the tanks' contents seem to go fine.  I then started pushing water in through the dump gate to flush them out and clean them out as usual.

About four minutes into the filling of the black water tank, I heard a loud clunk and water started spewing from the top of the black water tank!  The forward half had come off its mounting bracket, and though the main pipe was held up by the guard I'd installed before, great pressure on the 1.5" ABS pipe from the gray water tank feeding into the dump hub broke the pipe as well.

Yep, water all over the place, luckily "clean-ish" water and not sewage!  

The next day, while back at the RV storage yard, I got the tank back up flush against the bottom of the VRRV.  What a PITA.  I failed to see if there was a seal between the tube from the holding tank and the RV's bottom though.

I believe the forward mounting bracket had lost several of the screws used to hold it and the forward edge of the tank up.  The last one failed while I was filling the tank.  

Note the gap created by the pipe's break.


A bottom up view of the dump hub where the 1.5" pipe from the gray water tank connects.  The tape you see there was an earlier attempt to seal things without actually replacing the pipe.  No such luck.

The dump valve you see is for the black water tank.


As you can see below, there's not much to stop the downward fall of the black water tank, when one of its mount brackets fails.


By Sunday, yesterday, I'd installed two steel straps to support the black water tank in the event it ever comes off the mounts again.  Fingers crossed.

I also, proactively, added a 2x4 board with a 1/8" steel plate brace across the bottom of the gray water tank, to reinforce things.  The factory mount points on the rear edge looked fine and all present.

Gray Water Tank

Dale K., a neighborhood friend and retired Master Plumber came by and made short work of removing the failed pipe, reaming out the stub glued to the dump hub, and installing replacement piping.

He said in his decades of plumbing work, he'd never successfully removed broken off stubs of plastic tubes which were glued together....neither by heat or cutting methods.  

Instead, he used this Socket Saver tool.  Very nice tool indeed and it made short work of the remnants of the tube end which had been connected to the dump hub.


Here's how things looked after the repairs were done:

Looking from rear of RV to front:
Note the steel strapping.  I think it'll be strong enough.
I hope.

You can tell which pipes are the new ones, they're
the clean ones.  :)

This morning, Monday, the pipes in question passed a quick leak test.  I then put about ten gallons of water into the black water tank through the toilet and drove the VRRV to the storage yard at Buckley Space Force Base.

Draining the water at the FamCamp dump facility went well.  No leaks seen from the drive from home.  They must have radically increased the pressure of the water available at the dump station as the black water tank filled up in less than 4 minutes and I saw water gushing from the top of the tank, not, thankfully, from inside the toilet.

I'll admit I'm a bit leery/worried that water gushed out of the top of the black water tank where it mates to the underside of the RV.  Everything seems to be fine in terms of toilet operation, water storage and such but I won't be fully confident till I go through a few fill/dump cycles while camping.  I'm thinking there might have been a seal between the top of holding tank and the RV's underbelly.

I just have to make sure to only fill the black water tank with just a few gallons of water to flush out "remnants" during a dump operation.

I mentioned misc. in the post subject line:  


So, what do the "eyes" above say to you?  Put yourself in the perspective of an approaching camper trying to find a spot to park at .... would the above sight say: Hi, come on over and set up or would it say: Go away?

Update: Nov 18:  did a test fill of the black water tank again and saw water flowing out unexpectedly from the top of tank!  Dammit.  More to follow.

Monday, December 09, 2024

Home for a Bit

Returned from New Mexico after ten fun-filled hours of uneventful driving on the I-25 Super Slab.

After the morning chill had gone, it was pleasingly warm in New Mexico the couple of times I stopped to rest or gas up the VRRV.

This changed soon after I crossed into Colorado, with heavy cloud cover blocking the sun and adding to the overall gloominess and chill on the scenery.  This cloud cover wouldn't break till I got north of Colorado Springs.

It was getting dark as I pulled into my home cul-de-sac, got the trailer with Scarlett still onboard into the garage with no issues and parked the VRRV for the night.

My last view of the campsite as the sun started lighting up the eastern sky:


Sunday, December 08, 2024

Last Day of Boondocking for this Month, Probably.

Saturday, December 07

Another sunlit and "warm-ish" day here near San Antonio, NM.

Alas, it's time to go home before a forecasted snow storm closes Raton Pass, on the border between NM and CO on Monday.

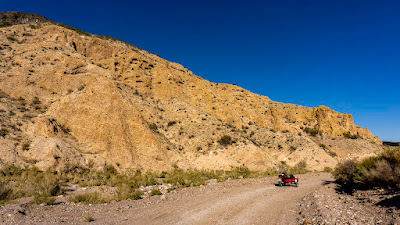
A short ride by Scarlett, my Ural Patrol Sidecar Rig was in order though before I put her back on the trailer.  I drove her to the canyon area about two miles away, which I'd explored before with Yagi, my TW200.

Same rocky formations as before, but as usual, Scarlett is quite a bit more photogenic:


I stopped by this formation to look at the many holes carved out of the side of the rocks.  

created by the winds perhaps?

Scarlett needs a new pusher tire, which is on order.  She slipped/slid in the deep sandy bits but managed to make it through with no major issues.  I didn't have to even put her into 2WD though it was close a couple of times!

Spent the rest of the afternoon mounting the motorcycles and taking down the gazebo.   This way, not much needs doing in terms of outside items tomorrow morning.

I'll be on the road tomorrow, Sunday, soon after waking as I've a long day on the road, at least eight hours.


Friday, December 06, 2024

Relaxing Near San Antonio, NM

Yesterday and today were pretty mellow days, lots of relaxing in the gazebo under bright sunshine, avoiding the sometimes chilling effect of winds.

Not very windy mind you, enough to get your attention and remind you of the effects of wind chill.

Today was much less windy than yesterday, thereby more enjoyable.

Yesterday's riding involved checking out the narrow canyon trail created along the old creek bed of Walnut Creek.  I rode Yagi all the way through this time until I saw signs of habitation in the distance.  I then retraced my route back towards camp.


The road/trail as you see is in quite good condition.  In fact, the VRRV would probably be able to drive it with no issues except for the sometimes very deep sandy spots where the creek bed used to be.

Today, it was time for Scarlett, my 2014 Ural Patrol sidecar rig to get some exercise.  I rode her along the same route as Yagi had already explored but not into the canyon, perhaps tomorrow for that.


That's Socorro Peak in the background


I didn't go very far, electing instead to spend more time at camp enjoying the warmish weather.  Amazing how bright sunlight and little wind add enjoyment to temperatures that never reached the forecasted 60 degrees.

One thing about this place and time of year, the sunsets aren't much so far:

Wednesday, December 04, 2024

Boondocking near San Antonio, New Mexico

Yesterday, Ileft the overcrowded cesspool that is the Metro Denver area yesterday and drove a bit over 8 hours to a BLM area near San Antonio, NM.

I'd hoped to reach the vicinity of Truth or Consequences but ran out of daylight an hour north of it.  So I took a chance at a new area as listed on iOverlander.

Turned out to be a good choice.  About three miles from the I-25 Interstate, just south of Socorro, NM, I found a nice spot next to a rundown corral.

This morning, while I waited for things to warm up into the 50s (woke to 37 degrees outside), I rode about the dirt roads near me:

First though, today's sunrise:


One of the roads led to some interesting rock formations:


Found a shrine in the rocks at the narrow passageway below:


I didn't ride much past the above cut through the rocks, I was getting cold even though I was riding slowly.

Later in the morning, it was still a bit chilly but I bundled up more and rode Yagi over through the nearby "town" of San Antonio and eight miles further, to the Bosque del Apache National Wildlife Refuge.

The town's claim to fame

A decommissioned church in town

The NWR is basically open lands with some stretches of woods, the main attractions being several lakes populated with diverse birds.  I checked out the North Loop Tour route and the highlight was:


I rode back to the campsite and spent the rest of the day resting and enjoying the warmth inside the gazebo.  Mild winds kept things a bit cool, even though temperatures neared 60 degrees and plenty of sunlight on hand.

The idea had been that this trip would last a month or two before returning to Colorado.  However, due to logistical matters involving the VA, I am returning to Colorado this weekend.  A bit of a bummer but its for the best.  There might be other camping trips closer to home but highly weather dependent of course.