Showing posts with label Mariko Mods. Show all posts

Wednesday, July 13, 2022

The Sammy gets a New Carburetor

Tuesday, July 12

Kudos to Gary at Certified Machine and Design Inc, the Toyota 3K Carburetor and Installation Kit I bought from his company made the installation of the new carburetor a snap!

The installation kit was well worth it, no fabrication of Throttle cable Bracket, EGR Valve Cover Plate, or the several bits of hardware to be sourced by me.  Also Tncluded was a finely machined aluminum spacer in order for the stock air horn to clear the new carburetor.

The only parts from the kit I didn't use were two fuel line clamps as I was struggling at the time to put them in place.  (Later, my fried Dale B. pointed out to me I had the right tool all along, doh!)  I used worm gear clamps instead.

Here's views of the new carb as it came out of the box:

Top

Front

Back

Right Side

Left Side

Bottom

Shiny isn't it?  We'll see how long that lasts.

Here's pics as it was installed this morning.  Whole thing took less than 2 hours, I was going slow and methodical.

The vacuum ports on the intake manifold
that are no longer needed and so, plugged.

The new carb mounted

Here's the carburetor with air horn mounted, note the silver colored aluminum spacer ring.  The throttle and choke cables were easy to install and adjust.  The instructions provided were clear and the provided pictures made things easy.


Here's a view of the two Tygon lines provided by Gary of Certified Machine.  The thinner one is the one, yes one vacuum line from the carburetor to the distributor for vacuum advance!  NO other vacuum lines!!!

The thicker line is the Tygon fuel line from the mechanical fuel pump to the carburetor.

Note the inline fuel filter before the entry line into the mechanical fuel pump, this is to ensure only clean gas gets to the Toyota 3K.  Dirty fuel plays havoc with them, as I imagine it does with any carburetor really.


I pumped out about half a quart of fuel before hooking up the carburetor to ensure any debris from the installation was not sucked into the carburetor.    Then I hooked the line to the carburetor and clamped it down with provided clamps.

Checked for leaks, and then she started right up!  I could be imagining things but the engine sounds quieter!  The one thing I had to adjust, was to bring up the cold idle two turns as it was running at 500 RPM.  I raised it to 950 RPM.

Note: see pic re which screw to use for idle speed.  I initially turned #3 (misread instructions).  #2 is the one.  Never touch #1, you become "on your own" in terms of support by Gary.  #3 is to adjust RPMs caused by choke, done during cold weather.


Dale and I took it on a test drive and she did beautifully!  I would end up doing two more test drives during the rest of today, no issues with the new carburetor.

I did manage to knock loose one of the horn wires, easily fixed.

I also managed to finally break off the spade connector on the temperature sensor for the coolant system.  I did manage to restore connectivity using an alligator clip inserted/clamped onto a spade connector and its online again.  I'll have to see if the clip is field replaceable or I have to get a new sensor.  (That can wait).


Going to do some more test driving tomorrow, to make sure all is well with the new carburetor.  I should have done this a long time ago!

As to the worry of some overzealous tech at the emission testing facility taking issue with there being a non-stock carburetor in play, I'm going to drive the Sammy by one of their mobile testing stations about a month before she's due for emissions testing and I'm sure she'll pass.

This way, no overzealous tech looks under the hood.

And yes, their Colorado AirCare website says that they only look for an oxygen sensor, catalytic converter and air pump (which the Sammy doesn't have).  But this way, no possible conflict with a tech.  The age of the Sammy also dictates the test done is the tailpipe test so all good, she's passed that one shortly after I bought it a year and a half ago.

I still can't get over how easy the install went, and how quiet the engine seems now.  Stay tuned.

Update: July 13: Completed a 100 mile round trip on pavement and dirt, with hills and trails thrown in for good measure.  The carburetor did great!  

Oh, and the occasional back firing is gone!

Tuesday, May 24, 2022

Miscellanea .... A Ride for Brigitta, the Sammy loses her new Oil Pressure Gauge and gains a Windjammer Clone.

In an effort to get some miles onto Brigitta's (my '87 R80 Beemer) odometer, I rode her all the way to the Hugo State Wildlife Area.  This was on Monday, May 16.  

It would prove windier than expected, especially while moving at 75 mph eastbound on the I-70 Super Slab towards the town of Limon, CO!  I had to go, several times, into "dancing in the winds" mode as gusts would hit me from the front right quarter mostly.

Still, got there OK, and discovered that a third of the SWA is now off limits, the southern third to be exact.  Not reason found except a sign stating the road leading to the southern campsites was now closed to all but "authorized" traffic.

Incoming weather had clouded up what had started as bright blue skies; so the pictures taken didn't turn out.

I returned via CO Hwy 74 into Colorado Spring's eastern suburbs, through the small town of Black Forest and finally onto CO Hwy 83.  A total of 256 miles ridden, and boy was I tired at the end of it!  I'm thinking my days of long distance riding on motorcycles, whether two or three wheeled, are coming to an end.

--------

The Sammy's new water pump continues to work fine.  The new normal, in terms of the temperature gauge on its dash, is for the needle to slowly climb towards the midpoint as the engine warms up and stay there.  No more going all the way to the 3/4 mark before then lowering to the middle and staying there for the rest of a drive.

---------

I went to the RV storage yard with a small air compressor and blew out the water lines on the VRRV.  We were expecting cold temperatures Friday/Saturday of this week you see.  A very late Winter storm had caused a Winter Weather warning to be issued to the Front Range.

Update: not much snow accumulation resulted in the Front Range.  Heavy, wet stuff that cause some tree damage as branches were overloaded and broken off.

---------

Spent a lot of time cleaning off the dirt and crud that had built up due to the failing old water pump.  Got a lot of dirt off the underside of the Sammy as well.  Of course, in the midst of doing this, I "improved" the routing and securing of the plastic tubing used by the oil pressure gauge I'd recently mounted.

This "improvement" proved fatal to the gauge's continued presence inside the Sammy.

Yesterday, I was returning from a short drive and had backed the Sammy into the garage intending to work on installing a plastic sheet behind the driver compartment (beginnings of Windjammer Clone)

To my dismay, I saw a trail of oil on the driveway and into the cul-de-sac as well!  Hastily shutting down the engine, I looked underneath the Sammy and there was oil pouring from the engine compartment and smoke was evident from burnt oil when I opened her hood.  Dammit.

Yep, the oil tube had worked itself loose and had come to rest against the hot edge of the exhaust manifold shield.  Melted of course, and had been spewing engine oil all over.

After unsuccessfully trying to replace the plastic tubing with brass tubing from a kit I'd prepurchased, I gave up and removed the oil pressure gauge and components.  The sandwich oil filter adapter remains, but all four ports are sealed now.  I'll probably remove the sandwich adapter next time I change the oil on the Sammy.

Needless to say, the spilled oil made quite the mess.  I spent most of the evening and part of next morning cleaning things up both on the Sammy and the driveway.

I also spent some time this week learning how to use a steamer to "shape" a straw hat I'd bought years ago.  What do you think?

Sunday, May 22

Spent most of the morning finishing the attachment of a homemade version of a Bestop Windjammer on the Sammy.  It basically mostly seals off the driver/passenger compartment 

Windjammer by Bestop
Image source: Amazon

In My opinion, the above clone actually does a better job of keeping the dust out than the actual Windjammer produced by Bestop.  It's a much quieter ride now.  The window is clear Plexiglas, and while a bit red-neck, the black Gorilla Tape should hold things secure.

Here's how she looks now, in Safari Top mode:


Saturday, May 14, 2022

Dealing with a Tight Soft Top and a couple of New Stickers

Now that the Sammy appears to be willing to be operational, it was time to do some other things for her.

Some of you were aware that the Sammy sported a sticker on the spare wheel which read:  "0 to 60, Eventually".  Something to perhaps give clueless drivers a hint that perhaps the Sammy doesn't accelerate as fast as normal traffic.

Today, I decided to remove it and try this one on to provide the occasional idiot a clue.  I also added a 4x4 oriented sticker as well, see if you can spot it.


Now, those of you who've had cars with soft tops, know that they're a pretty tight fit to start with; and almost impossible to attach all the fasteners.  In the Sammy's case, it's always been the ones securing the rear window.

As you can see, close but no cigar, unless one leaves the soft top under a hot sun for quite some time to soften things up.


Enter the solution which I found on the Internet, usually used for canvas covers on boats.  I'd used something similar to secure the rear clasps on the sidecar's tonneau cover for Scarlett.


I'd bought from Amazon ten sets of the above Lift-the-Dot fasteners.  They arrived today and I made up four extender straps.


In case you're wondering, the fourth one is on the right edge of the window.

Since the zippers for the rear window are shot/useless, being able to secure the four anchor points on the tailgate keep the window in place and not flapping.

I know, I know, I said something nice about the Sammy after the recent torture drive and she responded with a blown water pump.  You're probably thinking I'm just asking for more trouble.  We shall see.

May 15 Update:  Two long drives so far since this post first published, no issues!

Wednesday, May 04, 2022

An Oil Pressure Gauge for the Sammy

Given:  The Sammy goes through oil.  I think it's being burned and out the exhaust.  (No apparent leaks, which would be preferable)

So, a nearly religious daily pre-trip check of oil levels is required. 

Lately, she "seems" to steady at a bit above low mark on the dipstick.  Hmmm.

So today I added an oil pressure gauge and a Glowshift oil filter sandwich plate adapter that I bought from Amazon.  The Glowshift adapter went on with no issues, though I appear to have stripped one of the four port caps.

Glowshift 3/4-16 Thread Sandwich Adapter

The oil filter sandwich adapter goes between the oil filter mount and the oil filter, providing 4 ports to use for the installation of sensors. Onto one of the ports, I installed this kit:

Dorman 7-153 Kit.

I managed to pinch the tubing from the Dorman kit while feeding it through the firewall on the Sammy, dammit.  So basically I ended up using just the gauge pictured above.  The fittings didn't work right with the tubing I had left over from a previous project.  

After trying to "make it work", gave up and drove to the auto parts store and found this:

Bosch FST 7554

Sadly, the guys at the counter of the auto parts store had no clue, and I just happened to find the above kit while debating buying another oil pressure gauge to obtain access to the tubing/fittings kit that is included!

I had to remove the fitting that came with the Dorman gauge's kit (not compatible) and use the fitting that came with the FST 7554 kit, a little Teflon tape, and voila, a good oil seal!  (Before, large oil leaks!)

I'll monitor the adapter and fittings of course for leaks.  I am a bit leery of the oil tubing used and I'm not sure how durable it is.  I can see an electronic pressure fitting in the Sammy's future, but we'll see.

I went for a short test ride, the oil pressure gauge reports 50 PSI above 3000 RPM.  The Samurai's service manual says oil pressure should be between 42-60 PSI at 3000 RPM.

At idle, the pressure gauge drops down to around 20 PSI, which I believe is normal.

I'm hoping, the use of this oil pressure gauge, will give me a timely warning that the oil level in the engine has dropped too low.  I don't want to rely on the oil pressure sensor that comes with the Samurai, which uses an idiot light to tell you oil pressure is a problem.

NOTE: Though both the Dorman and Bosch tubing kits claimed 1/8 NPT threading, their components are NOT interchangeable!  The tubing for the Dorman kit was slightly narrowed in Outer Diameter than the Bosch Tubing!

Update: Had to bump up the idle from around 900 to 1100 RPM so that idle oil pressure was at least 12 PSI, at 900 it was barely 6 PSI!  Oh, and I found a 2.50 1/8-27 plug at Home Depot for the one I managed to strip while installing on the sandwich adapter, the OEM wanted $15 for two!

Thursday, October 28, 2021

Adjusting the Sammy's Carburetor and a new leak presents itself

Not related, mind you, the two events mentioned in the title!

Today, under guidance from RichardM who once again explained the concepts involved with Carburetor Secondaries in a manner which led to my enlightenment, I "adjusted" the setting screw for these on the Sammy.

Background: I had, you see, in my early days of Samurai ownership, messed about with this particular screw, thinking it was the idle adjustment screw, which it was NOT.

I realized this a long time afterwards, while discussing things via messaging with Mike W.  Mike is the Samurai Guru I go to as he's rebuilt several and owns two!  In the below picture, Mike is using a spare carburetor of his to point to the screw in question.  


The above screw actually affects the opening of the Secondaries, aka secondary Venturi's or butterfly valves within the carburetor.  These are the ones used when underway, under load and at speeds higher than just idle or low speeds.  They enable bigger air volume for the carburetor as more fuel is required for higher loads/speeds.

View of bottom of Carburetor's top half
The two round disks are the butterfly valves
image courtesy again of Mike W.

Then, just for reference, here's a pic of the correct idle adjustment screw, again courtesy of Mike W.


OK, that's the background, I had turned that wrong screw thinking it was the idle adjustment screw way back when, while troubleshooting idle speed.  Of course, I lost track of how many turns and direction, and failed to note how many turns from soft seat it was at.  Stupid.

Anyways, back to today.  I had thought/felt that there was an acceleration "slowness" with the carburetor or as RichardM aptly put it: "it seemed to run out of breath" under load.  After a failed attempt to look up "initial configuration" settings for this screw; I decided to just try turning the thing and test it while driving.

Got the engine nice and warmed up, and using same route each time, noted performance first without any changes to that screw.

Then, driving the same route after I had turned the screw outwards/counter-clockwise two full turns, I noted that she seemed slower in terms of acceleration response.  I saw that the RPMs would climb very slowly as I shifted into higher and higher gears.

Backed out the changes by turning the screw inward or clockwise two full turns, then turning further inward by two more turns.

Same route but now I noticed better performance!  No more slow acceleration or climbing of RPMs!  The Sammy felt faster when accelerating from a standing stop, I was able to keep up with traffic easier and pull away from the guy behind me at the light much better than before.   Before, I would sometimes be so slow while shifting from 1st gear to 2nd gear that I feared the idiot behind me wouldn't notice and ram me.  Now, I don't think that'll be an issue, unless of course its an asshole driver but nothing I can do about that eh?

Feeling optimistic, I stopped and turned the screw a half turn more inwards/clockwise.  Ran the route again but noticed a return of slight "bogging" under acceleration.  I know, very subjective, with no real objective measurements involved, but that's what I got.

So, I returned the screw to the two turns position and will call it good for now.

A New Leak

So, later on today, I noticed a new small puddle of what turned out to be brake fluid under the Sammy.  Dammit.

It was easy to see where it was coming from, the P & B Valve or Proportioning and Bypass Valve for the rear brakes on the Sammy: 


This part, is also called a Pressure Metering Valve and has a manufacturer p/n of 51910-83110. After much searching of the net for the wrong p/n's; I fortunately stumbled on the right p/n and the picture at the website verified I was correct!

image source: roadlessgear.com

I've ordered the part, hopefully it'll be here in a couple of days and I'll be replacing it.

I suspect, the internal seal(s) in this valve had been steadily deteriorating over the years.  I'd been noticing air leaking into the rear brake circuits for no apparently reason since I replaced the rear brake cylinders over the summer trip.

So, though pricey, in a way I'm glad this valve finally leaked enough that I was able to notice it.  I am pretty sure it's the source of air in the brake system of late!

The way she's leaking now at the valve, the Sammy will have to sit until I get this part replaced.  Not worth taking a chance of the leak getting worse while driving the car and losing my rear brakes!

Friday, August 13, 2021

Westward, Ho! Day 16: A hike, a drive to Florida, a Shrine, a mod to the soft top and another Dam

Busy day today as you might surmise from the the posting's title.

Before breakfast, while it was still cool, I rode Yagi over to the nearby trailhead for the Hickory Bluff  Overlook Trail.  Its only 2.5 miles to said overlook, and the only major hassle was continually walking into spider webs spun across the dang trail!  Rather disturbing, especially when you don't spot them first to clear them away with a stick.

The overlook's view proved boring and more of a vista as there were lots of trees in the way.  However, on the way back, I spotted some interesting fungi and wood remnants:

These mushrooms were the size of dinner plates!

This wood fragment left over from when the tree was cut down
reminded me of a cityscape at first, then a 3D image of an audio wave form.

Getting back on Yagi, I rode over to the boat ramp next to the Blackjack Marina, located next to the campground, and was able to catch the water almost mirror smooth:


Heading over to check out the marina, I saw the Park Ranger's patrol boat heading out onto the lake, note the large pair of outboard engines on this craft:


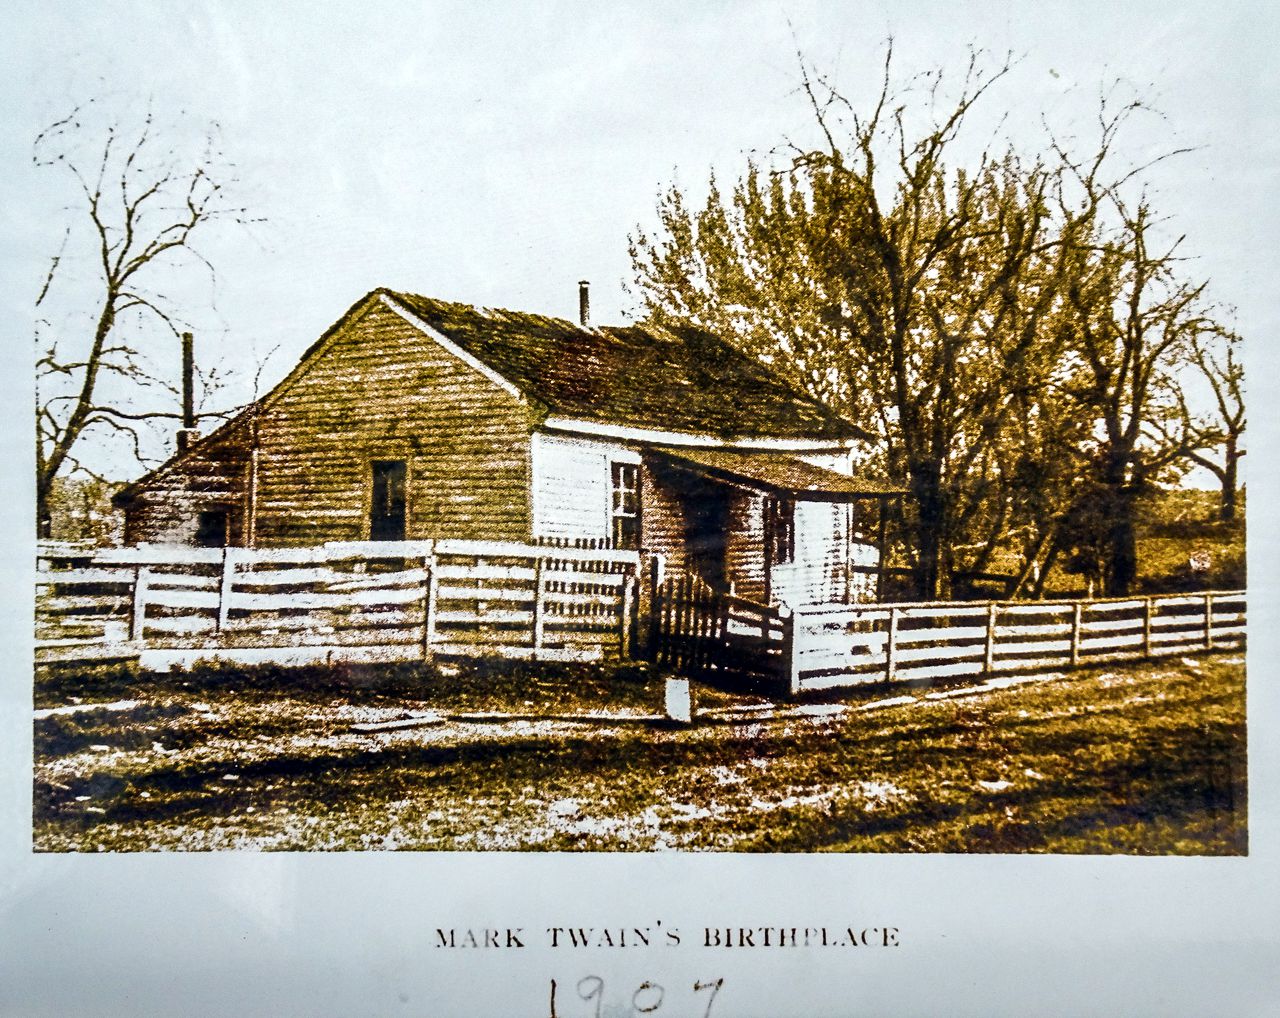
After breakfast and close to 9:30AM, I drove out on the Sammy to visit Florida.  The town of Florida, MO that is.  The town which was the birthplace of Samuel L. Clemens, better known as Mark Twain.


The Mark Twain State Park is located near Florida and is the site of the Mark Twain Birthplace State Historic Site, or Shrine.  It's a neat museum, with free admission, with the main display being the house that Samuel Clemens was born in.

The house is inside the shrine building, having been moved there from its location in the nearby town of Florida.


Samuel L. Clemens aka Mark Twain
Born under Halley's Comet, died when the comet came back next.
Quite the coincidence don't you think?
1835-1910

Here's a shot of the house's main room:


A shot from the other side of the main room:


The second of the two rooms comprising the house, the bedroom:


In case you ever see one in a second hand bookstore:


This is apparently the story that launched Mark Twain's career as a celebrated author:


The Sammy in front of the Shrine Building

Driving over to the town of Florida, which is now just a self-described RV/Cabin settlement, I checked out the marker where Mark Twain's house had originally been located:


Yep, the bust is now in the museum


If you like Mark Twain's writing, and you're ever near Florida, MO, I recommend you check out the shrine/museum.  He's Missouri's favorite son I think, with lots more places dedicated to his memory.

On the way back to the campground, I spotted and got this picture of a low flying crop duster plane:


The rest of the afternoon was spent reading my book in the shade of the VRRV's awning in somewhat warm but not too hot weather.

After seeing a suggestion on the Samurai group forum on Facebook, I decided to try folding the soft top on the Sammy to emulate a Safari Top.  A Safari Top is basically the roof only, all the sides and rear window are folded up or removed.

I can't remove the sides on the Sammy's soft top of course, as its not designed that way.  But with some careful folding, some Velcro ties, a strap  and some small bungie cords, I got this:

So, what do you think?  I kind of like it.

I drove the Sammy over to the Clarence Cannon Dam, a few miles to the east of the Ray Behrens Rec Area to test the security of the Safari Top's lashings.  All good, got up to 65 mph at one point, with no issues.


I then drove some more, heading west towards the small town of Perry, MO.  Again, the Safari Top stayed right where it was supposed to; and I got gas in town before heading back to camp.

Busy day seemingly but really not.  I plan on checking out the dam again in the early morning tomorrow as the light will be shining on the spillway side I think.  There's also the visitor center to check out later in the morning as well.